

You can design your own house plans by working through a fixed sequence: define what you need, study the lot, sketch the room relationships, set the footprint, lay out the rooms, place stairs and openings, design the roof and then produce dimensioned drawings. Doing it in this order prevents most of the costly rework that happens when people start by drawing their favorite room and try to fit the rest of the house around it.
You do not need to be an architect to make your own house plans, but you do need exact dimensions and a way to check the design in 3D. A house planning program such as Plan7Architect Pro handles the technical part, from automatic dimensions to sections and plan sheets, so you can concentrate on the design itself.
This guide walks through every step with the typical numbers I use when I plan a house. Before you start, it helps to know what homeowners are allowed to draw where you live; our article can I draw my own house plans covers the basics.

Step 1: Write Down What the House Must Do
Every good plan starts with a list, not a drawing. Write down:
- Number of bedrooms and bathrooms, and who uses them
- Rooms you need beyond that: office, laundry, mudroom, pantry, guest room, garage
- How you live: open kitchen or separate, formal dining or not, one level or several
- Your budget and the approximate floor area it allows
- Things you want to avoid from your current home
Then give each room a target size. The following values are practical starting points:
| Room | Typical size |
|---|---|
| Living room | 14 by 18 to 16 by 22 feet (about 4.3 by 5.5 to 4.9 by 6.7 m) |
| Kitchen | 10 by 12 to 14 by 16 feet (about 3 by 3.7 to 4.3 by 4.9 m) |
| Primary bedroom | 12 by 14 to 14 by 16 feet (about 3.7 by 4.3 to 4.3 by 4.9 m) |
| Secondary bedroom | 10 by 11 to 11 by 12 feet (about 3 by 3.4 to 3.4 by 3.7 m) |
| Full bathroom | 5 by 8 to 8 by 10 feet (about 1.5 by 2.4 to 2.4 by 3 m) |
| Laundry room | 6 by 8 feet (about 1.8 by 2.4 m) or more |
Our room size guide goes into each room in more detail.
Step 2: Study the Lot and the Rules
The lot decides more about your house than any room list. Find out:
- Property lines and setbacks from the front, side and rear lot lines
- Maximum building height and lot coverage
- Slope of the terrain and where water drains
- Where the sun comes from and where the best views are
- Access for the driveway, utilities and the building site
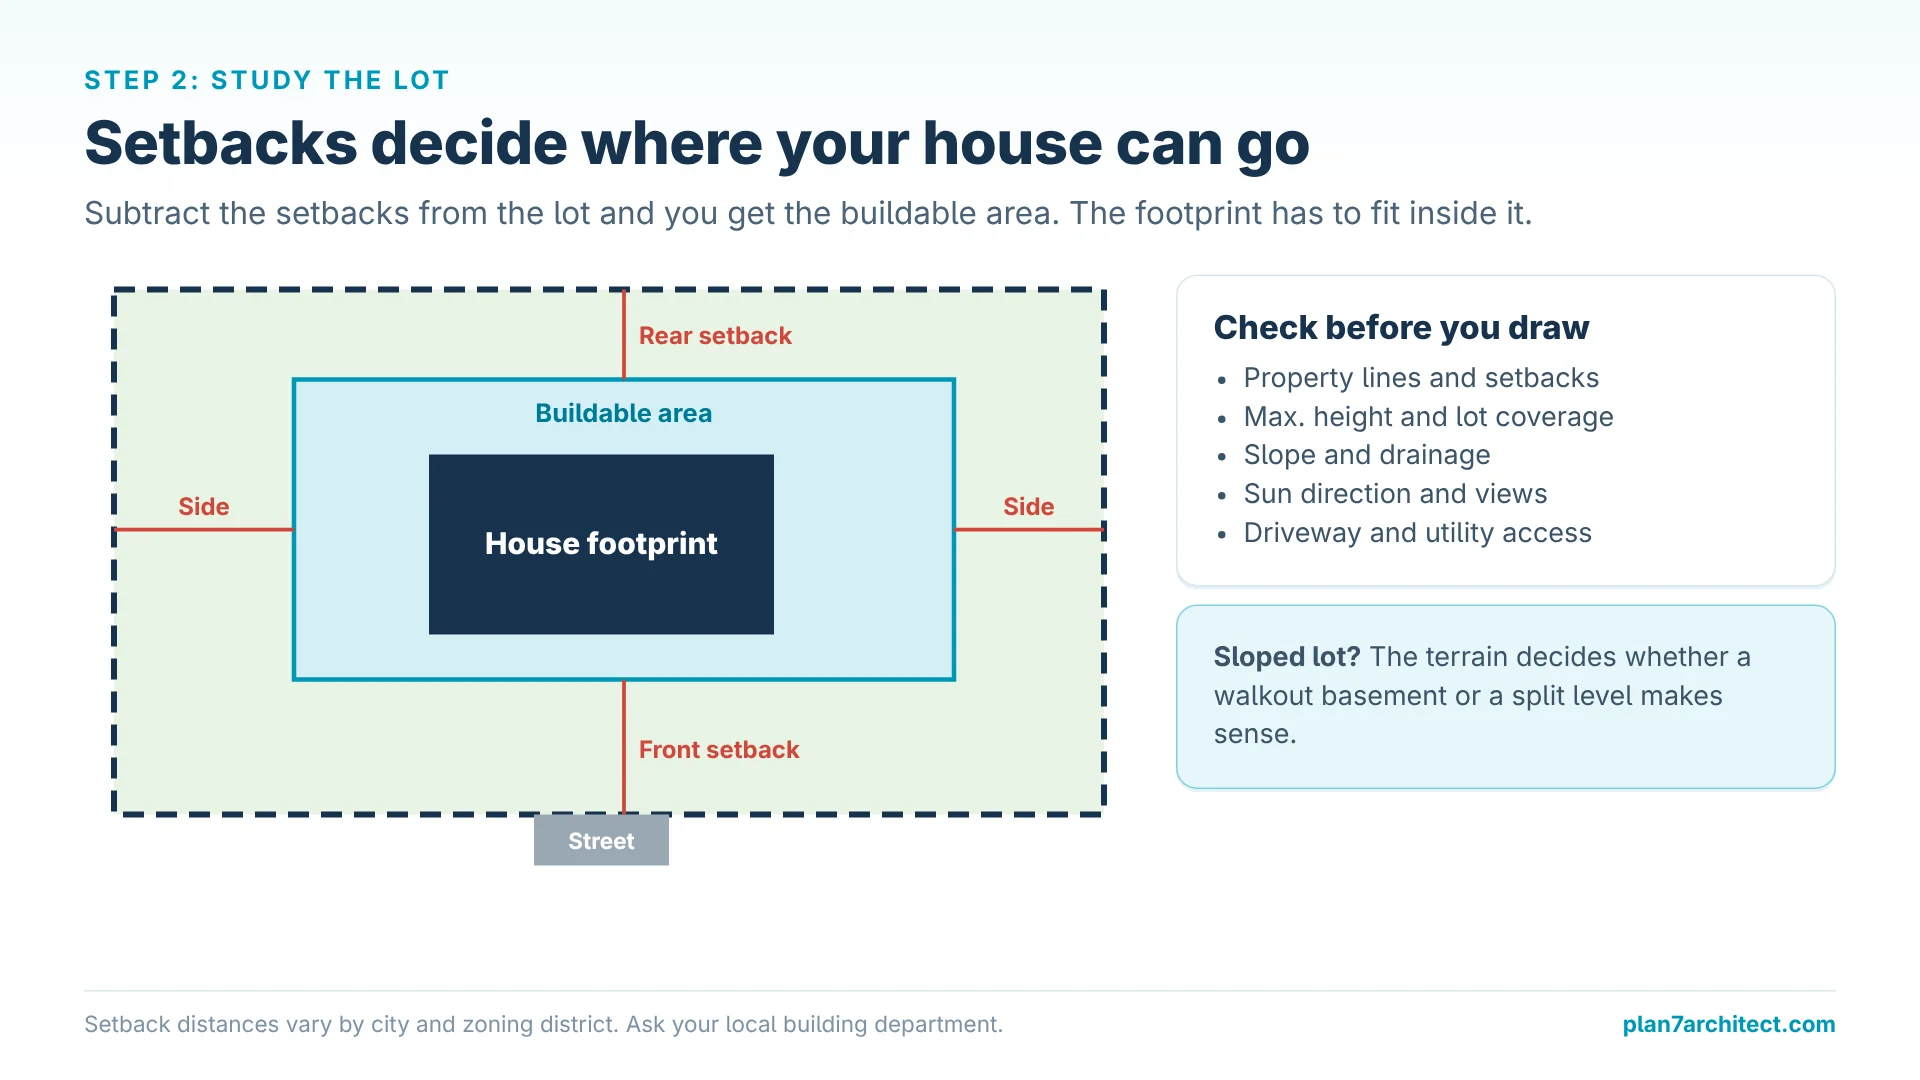
Subtract the setbacks from the lot and you get the buildable area. Your footprint has to fit inside it. On a sloped lot, the terrain also decides whether a walkout basement or a split level makes sense.
Step 3: Sketch How the Rooms Relate
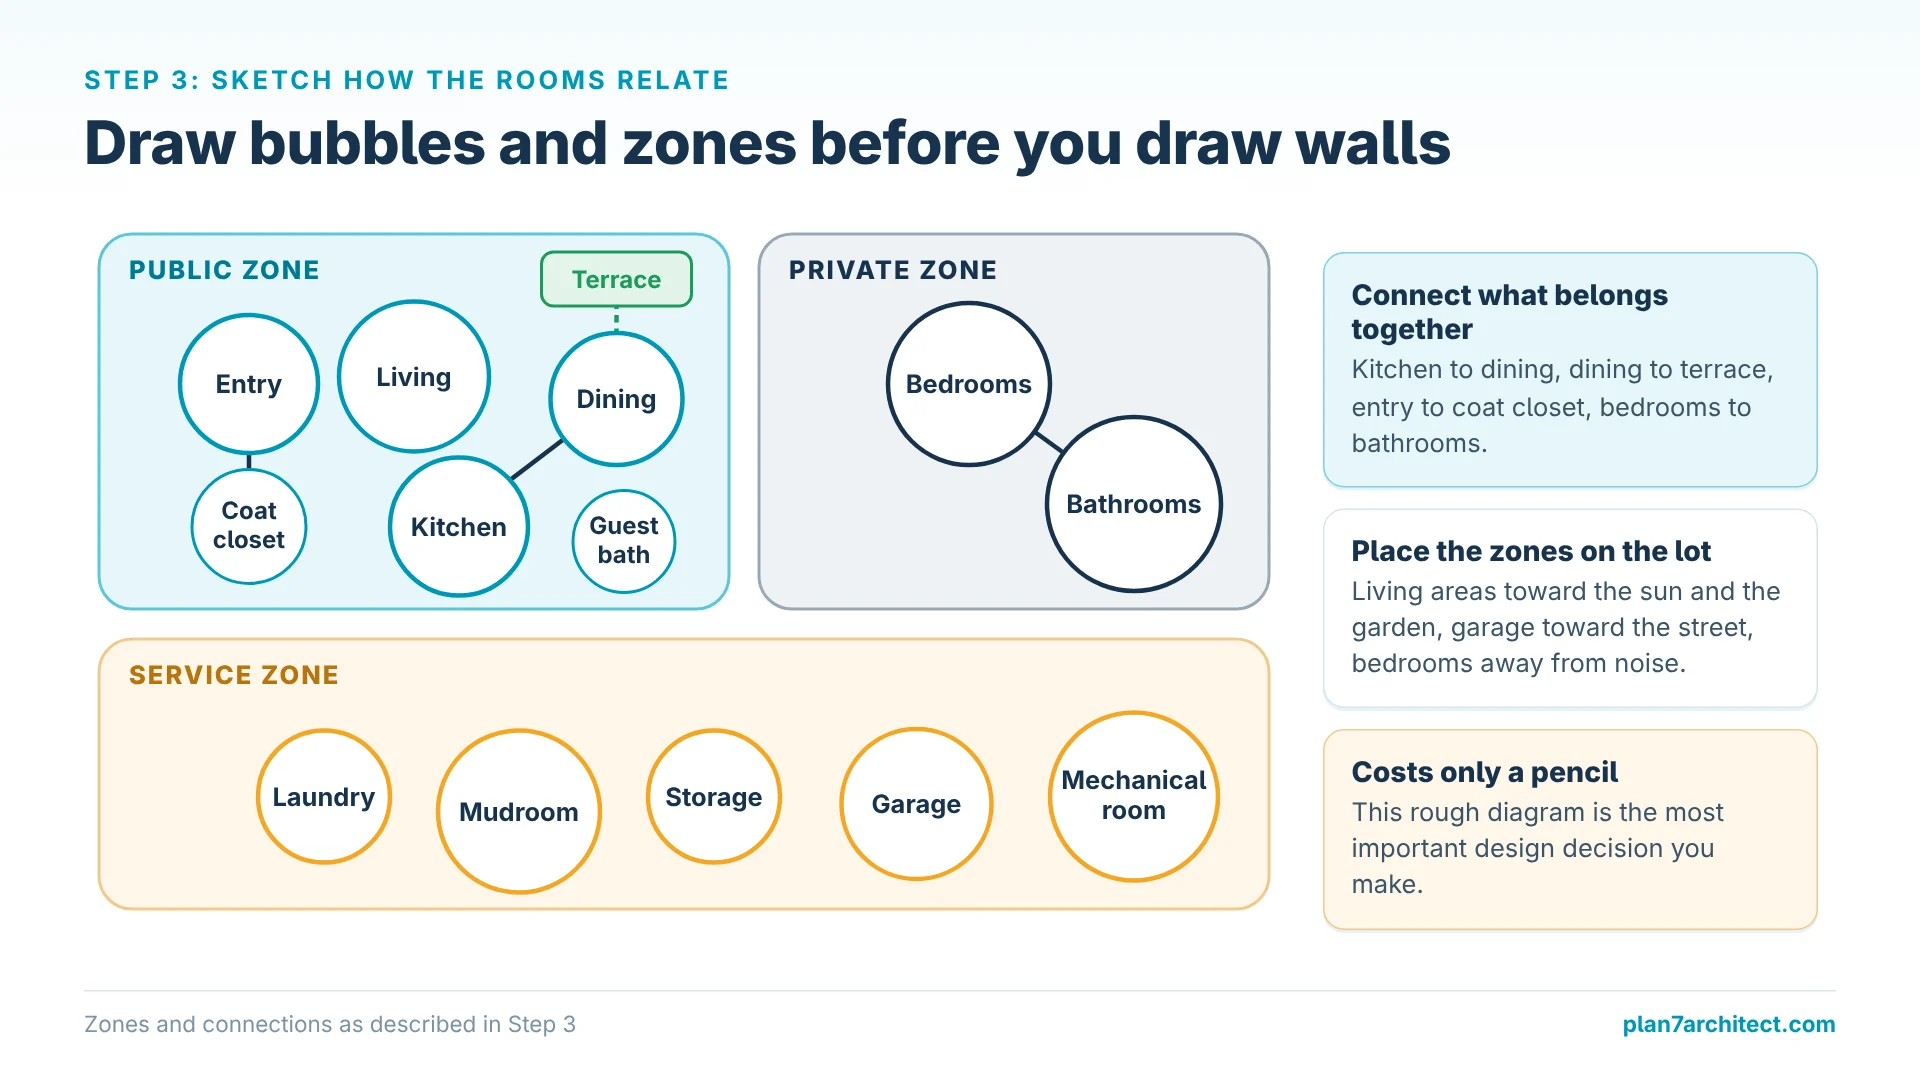
Before you draw walls, draw bubbles. Put each room on paper as a circle and connect the rooms that need to be next to each other: kitchen to dining, dining to terrace, entry to coat closet, bedrooms to bathrooms. Group the house into zones:
- Public zone: entry, living, dining, kitchen, guest bathroom
- Private zone: bedrooms and bathrooms
- Service zone: laundry, mudroom, storage, garage, mechanical room
Place the zones on the lot: living areas toward the sun and the garden, the garage toward the street, bedrooms away from noise. This rough diagram is the most important design decision you make, and it costs only a pencil.
Step 4: Set the Footprint
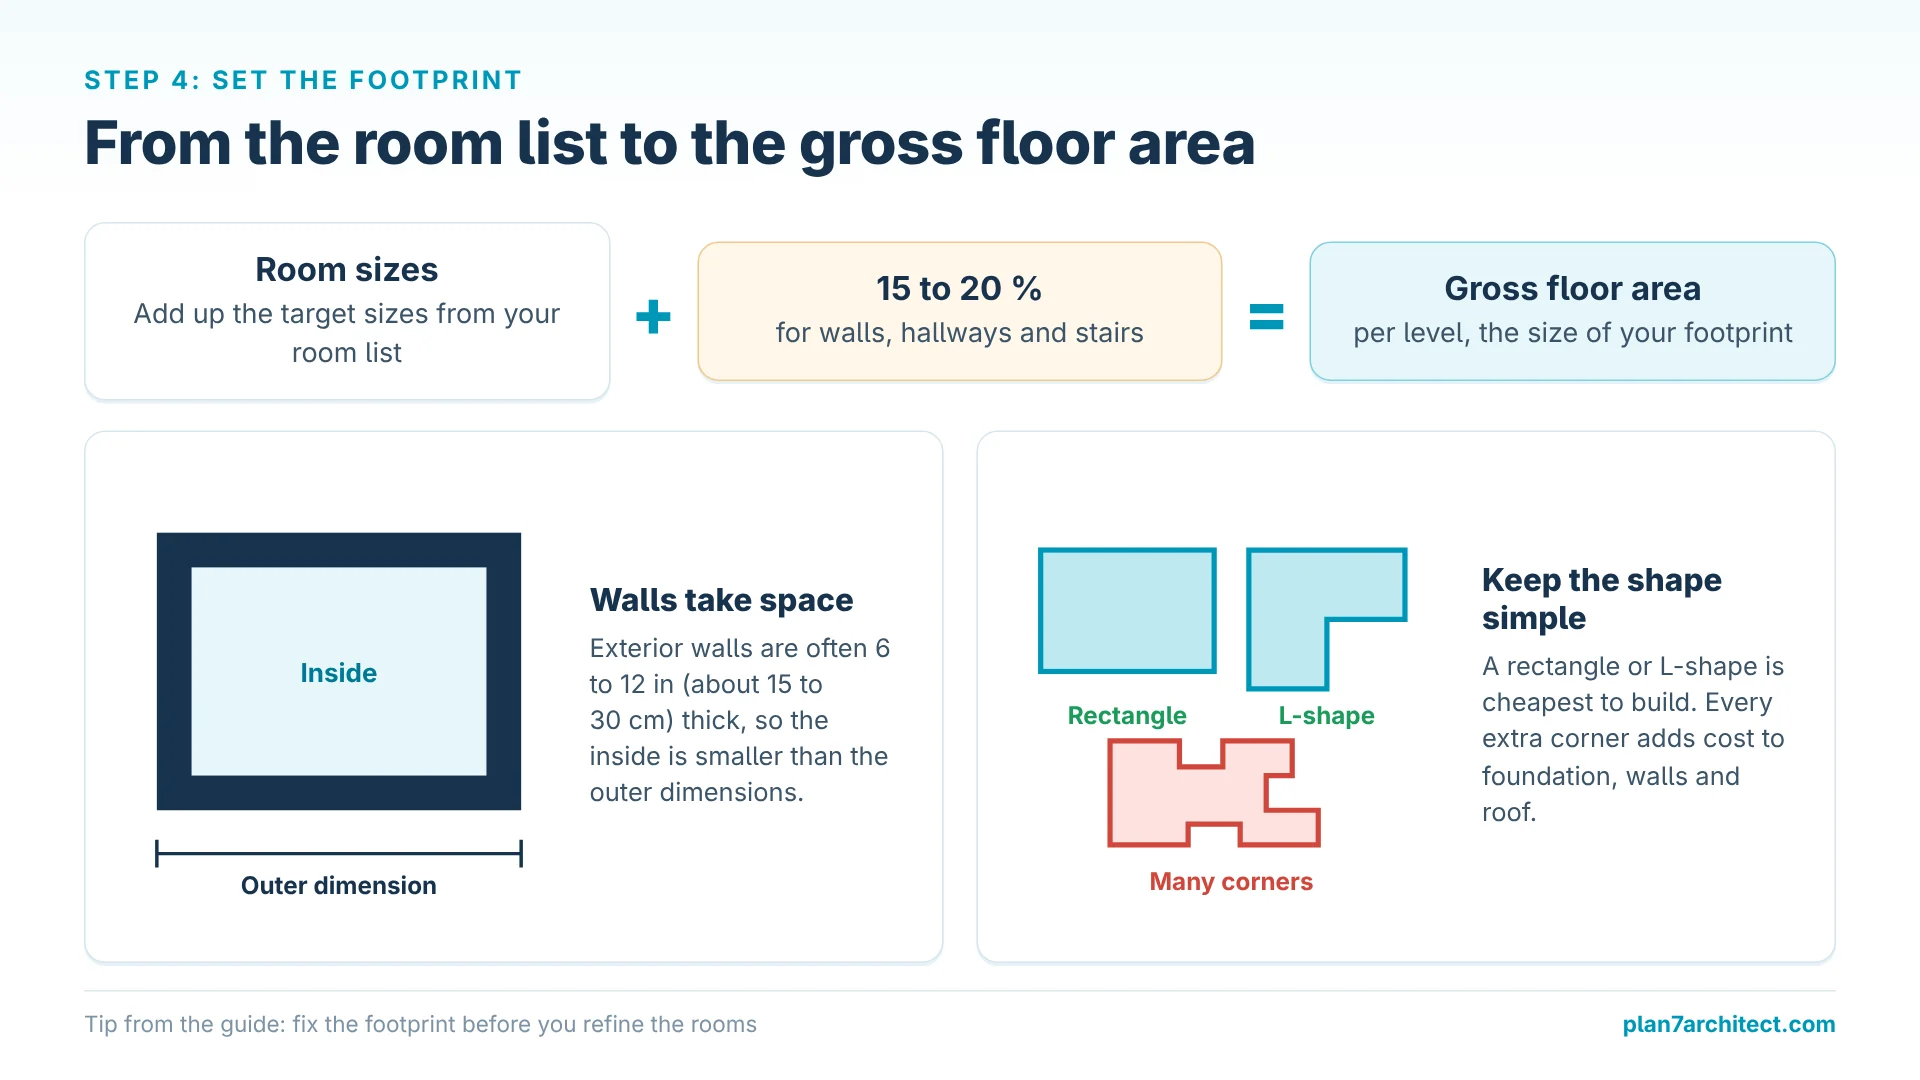
Add up the room sizes, then add about 15 to 20 percent for walls, hallways and stairs. That gives you the gross floor area per level. A simple rectangle or L-shape is cheapest to build; every extra corner adds cost to foundation, walls and roof.
Now draw the exterior walls in your software with exact lengths. Remember that exterior walls are often 6 to 12 inches (about 15 to 30 cm) thick, so the inside of the house is smaller than the outer dimensions. Our article on wall thickness lists typical values.
Step 5: Lay Out the Rooms
Divide the footprint according to your bubble diagram. Keep these clearances in mind:
- Hallways about 36 to 42 inches (about 90 to 110 cm) wide
- Interior doors usually 30 to 36 inches (about 76 to 91 cm) wide
- At least 36 inches (about 91 cm) of walking space around a bed
- 42 to 48 inches (about 107 to 122 cm) between kitchen counters
Stack bathrooms and the kitchen close to each other where possible. Shorter plumbing runs save money and make the plan simpler.
Step 6: Place the Stairs, Doors and Windows
A straight stair for an 8-foot ceiling (about 2.4 m) usually takes a space of about 3 by 12 feet (about 0.9 by 3.7 m) in plan, plus landings at top and bottom. Place it early and design the upper floor around it. Our guide on calculating and drawing a staircase shows the calculation.
Doors should not open into each other or block furniture. Windows should serve the room, the furniture and the facade at the same time, which is easiest to judge in 3D.

In Plan7Architect, doors and windows create their openings automatically when you place them, and the 3D view updates at once. That makes it easy to try a window at a different height or a door on another wall and see the effect immediately.
Before you place the stair in your plan, check how many risers and how much run it needs for your floor-to-floor height.
Step 7: Design the Roof and the Exterior
Choose the roof type early, because it affects the upper floor: knee walls, sloped ceilings and usable area under the roof. Gable roofs are simple and economical, hip roofs are robust in wind, shed roofs suit modern designs and allow high windows on one side.
Plan7Architect constructs gable, hip, shed, flat and mansard roofs automatically from the outline and pitch, and adds dormers. Check the elevations: windows that line up, a front door that is easy to find and a roof that fits the size of the house.
Step 8: Check Everything in 3D
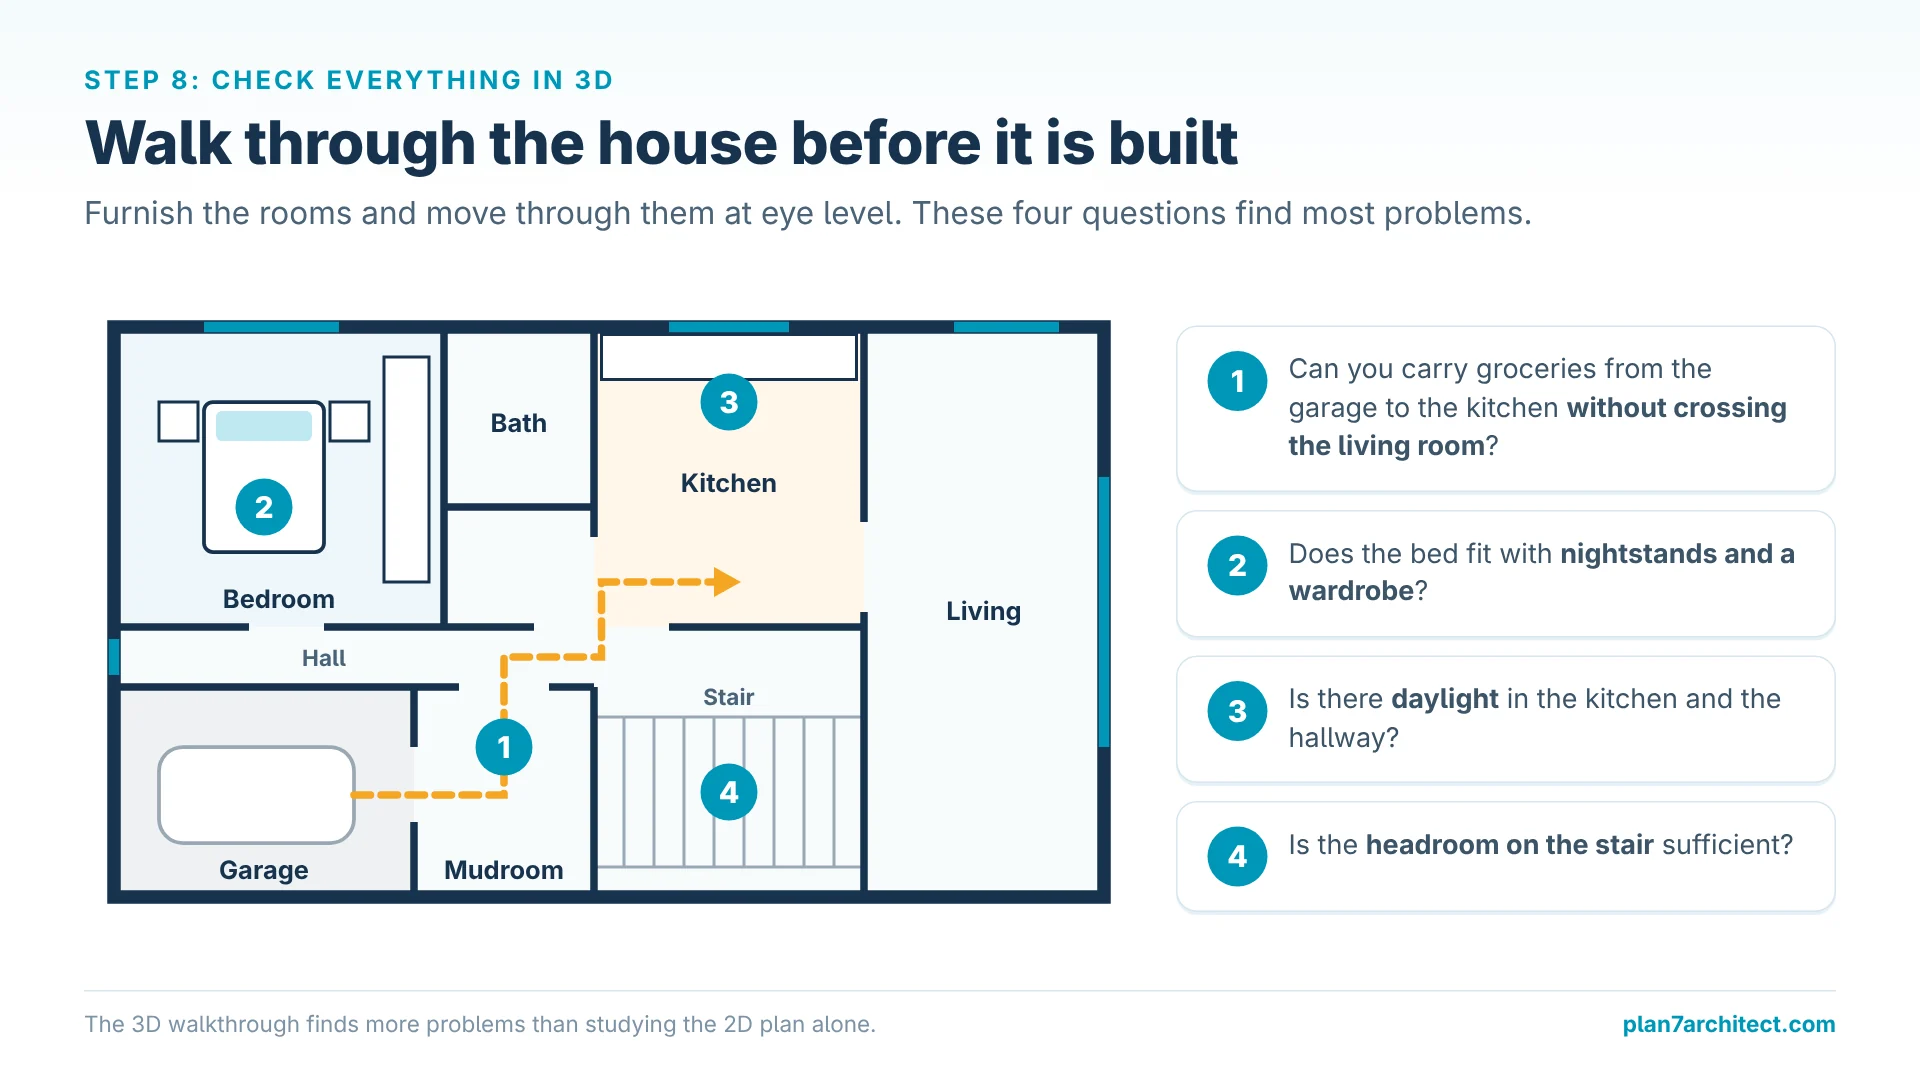
Furnish the rooms and walk through the house at eye level. Ask:
- Can I bring in groceries from the garage without crossing the living room?
- Does the bed fit with nightstands and a wardrobe?
- Is there daylight in the kitchen and the hallway?
- Is the headroom on the stair sufficient?
In my experience, this walkthrough finds more problems than any amount of studying the 2D plan.
Step 9: Produce the Drawings
When the design is final, create the drawing set:
- Floor plans for every level with dimensions, room names and areas
- Elevations of all sides
- At least one section through the stair and one through the main rooms
- A site plan with the house on the lot
- Roof plan and, if needed, electrical and plumbing layouts
Place the drawings on sheets with a title block, print them to scale or save them as PDF, and export DWG or DXF for anyone who continues the work in CAD. For a new house, structural details and calculations usually come from an engineer, and many areas require stamped plans, so check with your building department which drawings you need.
Common Mistakes When Designing Your Own House Plans
Starting with One Dream Room
A perfect kitchen in the wrong place ruins the plan. Start with zones and the footprint.
Forgetting Storage
Closets, a pantry and space for the vacuum, the stroller and the holiday decorations are easy to forget and hard to add later.
Too Many Corners
Every jog in the outer walls adds cost to the foundation, the framing and especially the roof.
Design Your Own House Plans with Plan7Architect
With Plan7Architect Pro you can create professional house plans yourself: walls with exact dimensions, rooms with automatic area calculation, doors, windows, stairs, all roof types with dormers, terrain and the lot, plus a 3D walkthrough to check every step. You work in feet and inches or metric units and create floor plans, sections, elevations and plan sheets that you print to scale or export as PDF, DWG or DXF. It costs Original price was: $259.99.$99.99Current price is: $99.99. once, without a subscription. Every purchase includes a 14-day right of withdrawal, so you can simply cancel your purchase by email if the software is not right for you.

Plan your project with Plan7Architect

Plan7Architect Pro 5 for Original price was: $259.99.$99.99Current price is: $99.99.
You don’t need any prior experience because the software has been specifically designed for beginners. The planning process is carried out in 5 simple steps:
1. Draw Walls

2. Windows & Doors

3. Floors & Roof

4. Textures & 3D Objects

5. Plan for the Building Permit

6. Export the Floor Plan as a 3D Model for Twinmotion

- – Compliant with international construction standards
- – Usable on 3 PCs simultaneously
- – Option for consultation with an architect
- – Comprehensive user manual
- – Regular updates
- – Video tutorials
- – Millions of 3D objects available
Why Thousands of Builders Prefer Plan7Architect
Why choose Plan7Architect over other home design tools?
Watch how a complete house is planned from start to finish – in under 25 minutes
Detailed House Planning (25 Min)

Small Home Planning Demo (12 Min)

Short House Planning Demo (6 Min)

The 3 Plan7Architects

Suitable for small hobby projects
No garden planning and only limited floor plan creation with few wall types
★★★★★

For medium-sized projects
Unrestricted floor plan creation & garden planning
No export options for your architect and no plans for building permit applications
★★★★★
For projects of any size
Import & export for working with an architect
Create plans for real building permit applications
Much larger range of features than the other two versions
★★★★★
Verified Customer Reviews
More on this topic: Floor Plans & House Design Guides – all articles
You might also like: