

Workshop layout software lets you plan a woodworking shop, garage workshop or small industrial workshop to scale: the room or building itself, the position of every machine and workbench, the clearances around them, and the electrical and dust collection runs. Planning the layout on a computer first shows you whether a table saw has enough infeed and outfeed space, whether long boards can move through the shop and where outlets must go, before you pour a slab or bolt down a single machine.
The best workshop design software handles two things at once: the building, with walls, doors, windows and roof, and the interior layout with real-size equipment. Plan7Architect Pro does both, because it is house planning software that also covers garages, outbuildings and small commercial buildings. Below I explain how to plan a workshop layout step by step, with the typical dimensions I use, and how to do it in the software.

What Workshop Layout Software Needs to Do
- Exact room dimensions of an existing garage or basement, or a new workshop building with walls, doors, windows and roof.
- Equipment at real size including the working space around each machine, not only its footprint.
- 3D view to check ceiling height, shelves above benches and the path of long material.
- Electrical planning for outlets, lighting and machine circuits.
- Layout variants so you can compare two arrangements before you decide.
- Printable plans for the electrician, the builder or the permit, if you build a new structure.
Typical Workshop Sizes
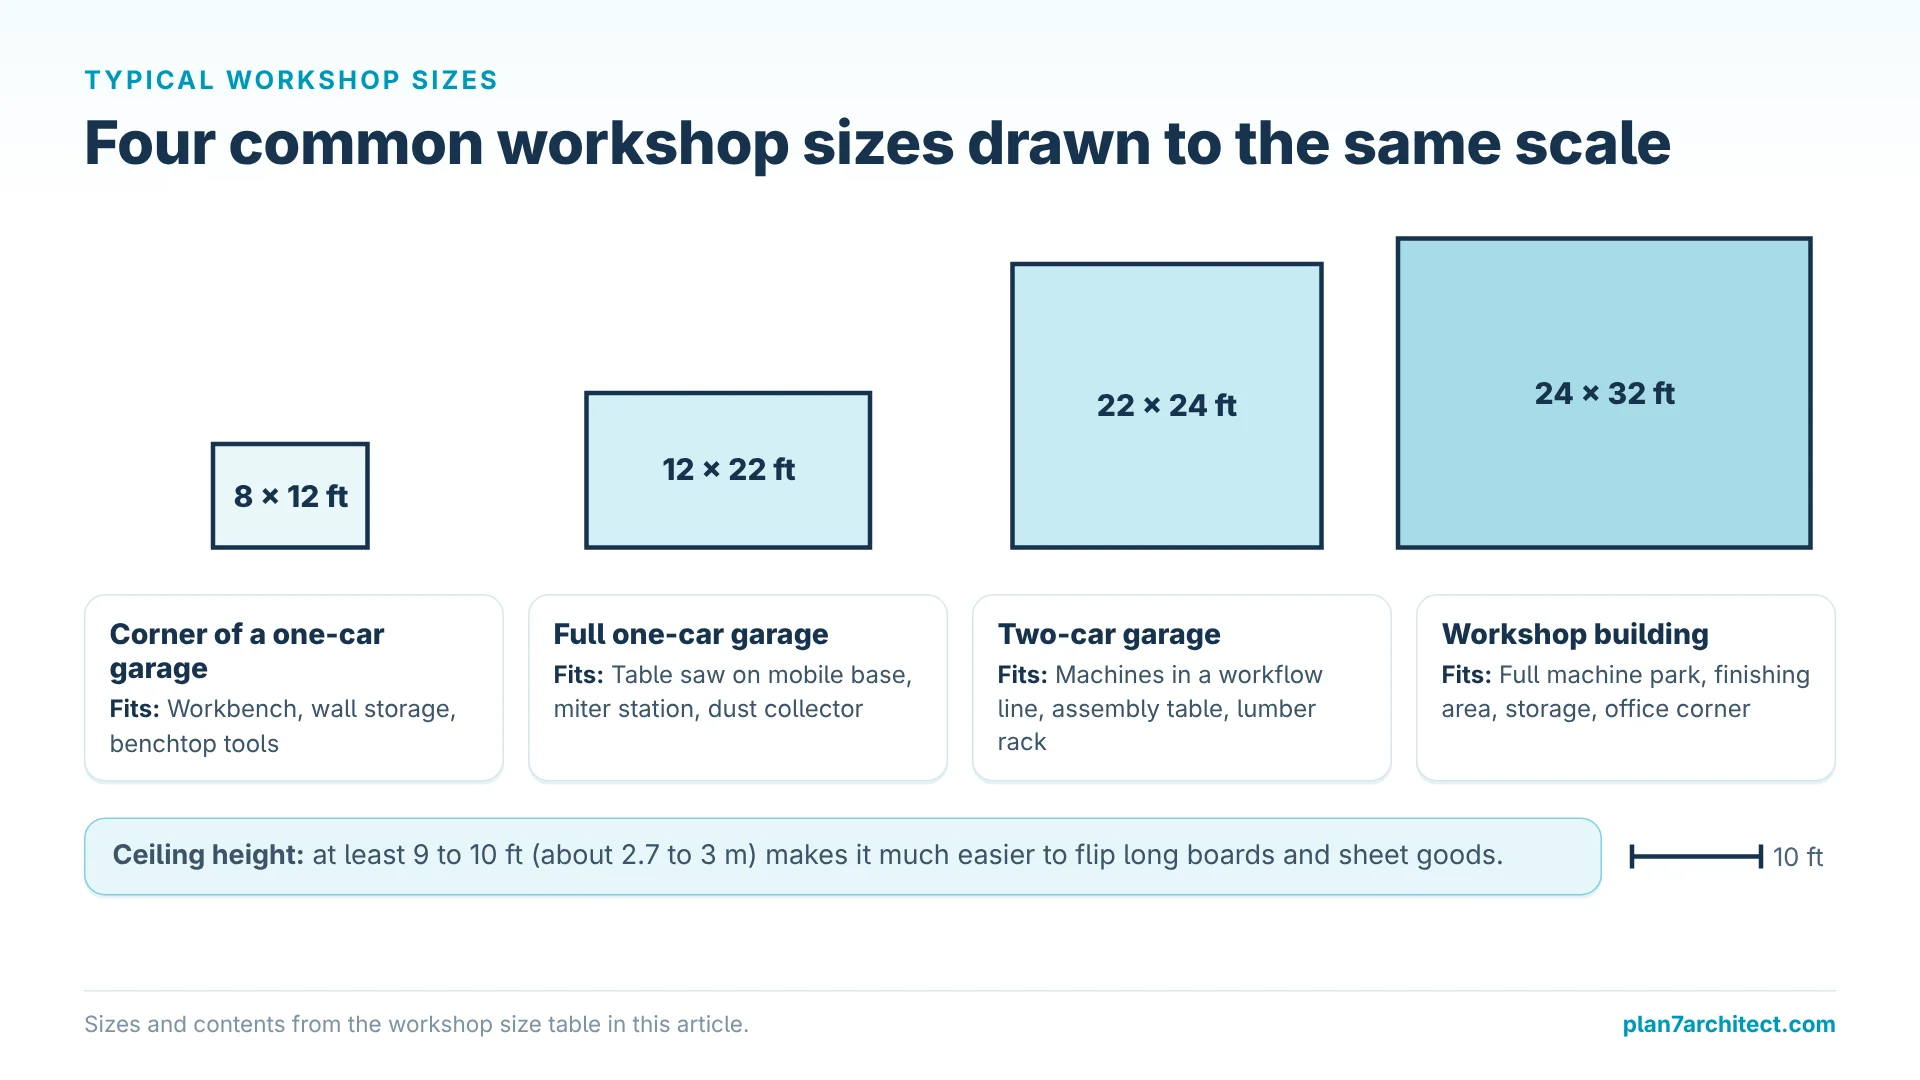
The available space decides how you organize the shop. These are common starting points:
| Workshop | Typical size | What fits comfortably |
|---|---|---|
| Corner of a one-car garage | 8 by 12 feet (about 2.4 by 3.7 m) | Workbench, wall storage, benchtop tools, mobile bases |
| Full one-car garage | 12 by 22 feet (about 3.7 by 6.7 m) | Table saw on mobile base, workbench, miter saw station, dust collector |
| Two-car garage | 22 by 24 feet (about 6.7 by 7.3 m) | Stationary machines in a workflow line, assembly table, lumber rack |
| Dedicated workshop building | 24 by 32 feet (about 7.3 by 9.8 m) or more | Full machine park, separate finishing area, storage, office corner |
A ceiling height of at least 9 to 10 feet (about 2.7 to 3 m) makes it much easier to flip long boards and sheet goods. In a new building, this is one of the cheapest upgrades you can make.
Clearances Around Machines and Workbenches
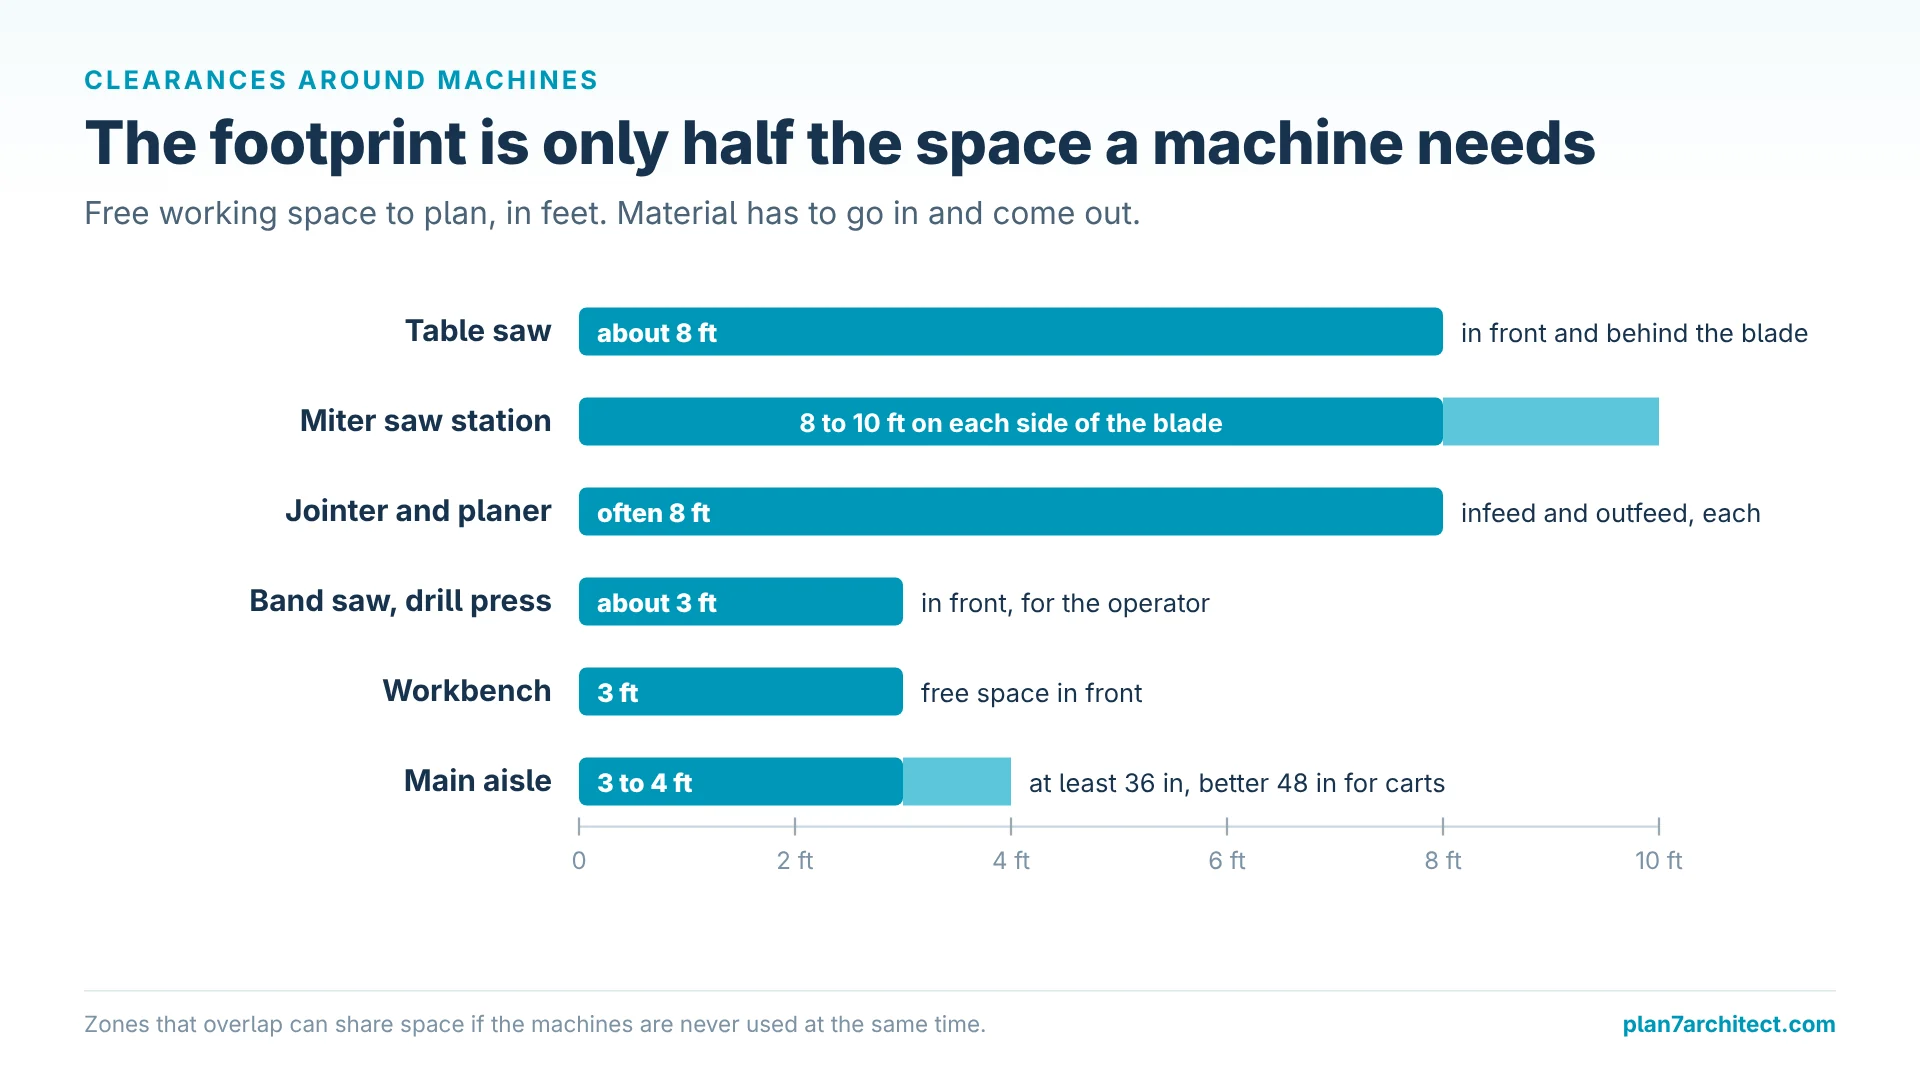
The footprint of a machine is only half of the space it needs. Material has to go in and come out.
| Equipment | Working space to plan |
|---|---|
| Table saw | About 8 feet (about 2.4 m) in front and behind the blade for full sheets, plus space on the left for crosscuts |
| Miter saw station | About 8 to 10 feet (about 2.4 to 3 m) on each side of the blade for long boards |
| Jointer and planer | Infeed and outfeed at least the length of your longest boards, often 8 feet (about 2.4 m) each |
| Band saw, drill press | About 3 feet (about 0.9 m) in front for the operator, more for long pieces |
| Workbench | 30 to 36 inches (about 76 to 91 cm) deep, 34 to 38 inches (about 86 to 97 cm) high, 3 feet (about 0.9 m) free space in front |
| Main aisle | At least 36 inches (about 91 cm), better 48 inches (about 122 cm) for carts |
Machines whose infeed and outfeed zones overlap can share space, as long as you never need them at the same time. A table saw and a jointer placed in line, at slightly different heights, is a classic space saver.
How to Plan a Workshop Layout Step by Step
1. Define the Workflow
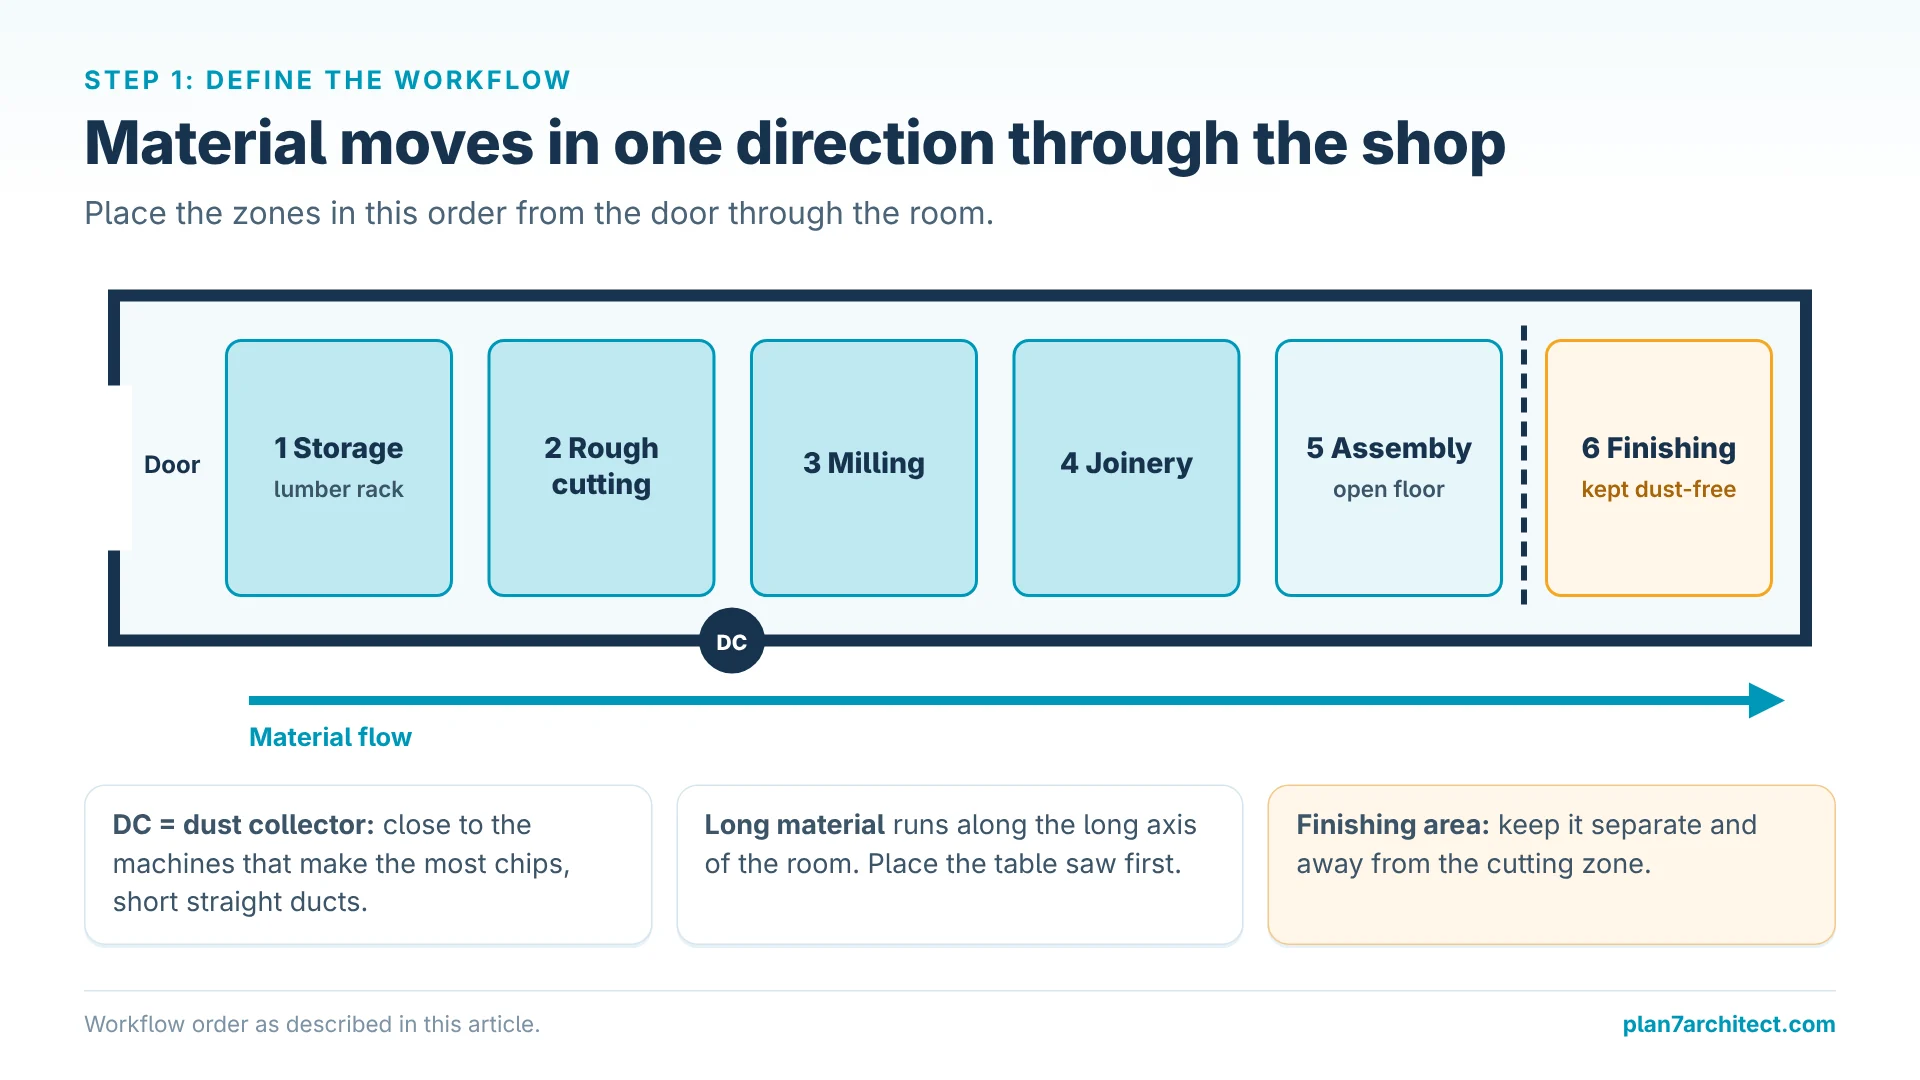
Material in a woodworking shop usually moves in one direction: storage, rough cutting, milling, joinery, assembly, finishing. Place the zones in that order from the door through the room. Our article on designing a professional joinery workshop floor plan shows the same principle at a larger scale.
2. Measure or Draw the Space
For an existing garage, measure walls, doors, windows, posts and existing outlets. For a new building, draw the walls, the overhead door and the roof first.
3. Place the Large Machines
Start with the table saw, because it needs the most space in all directions. Then place machines that handle long material along the long axis of the room.
4. Add Benches, Storage and Assembly Space
Wall storage above benches, a lumber rack near the entrance and an open assembly area in the center.
5. Plan Dust Collection
Keep the dust collector close to the machines that produce the most chips, with short, straight duct runs. In a separate finishing area, dust is your enemy, so keep it away from the cutting zone.
6. Plan Power and Light
Outlets every few feet along the benches, dedicated circuits for larger machines, and bright, even overhead lighting. The actual wiring should be designed and installed by a licensed electrician according to local code.
7. Check Everything in 3D
Walk through the shop with a virtual sheet of plywood. If it hits a shelf, a light or a post, change the plan.
Planning a Workshop in Plan7Architect
In Plan7Architect, the workshop starts as a building or as a room inside an existing house or garage. You draw the walls with exact lengths, add the overhead door, entry door and windows, and set the ceiling height. For a new workshop building, the program constructs the roof, and you can plan the foundation, timber framing or beam structures.

Inside, you place benches, shelving and equipment from the object library, or import machine models from the SketchUp 3D Warehouse. Every element can be adjusted to the exact size of your own machines and saved to the catalog for reuse. Guide lines and layers help you draw clearance zones, and electrical planning lets you place outlets, switches and lights in the same project. Our article on electrical planning with Plan7Architect shows how this works.
Because the 2D plan and the 3D model are synchronized, you can arrange the layout in 2D and immediately check it in 3D. Plan variants let you keep two or three layouts and compare them. When you are done, print the plan to scale or export it as PDF, DWG or DXF for your electrician or builder. More ideas for small buildings are in our article on shed and workshop design software.
Workshop Layouts for Different Uses
Woodworking Shop
Long material, large machines and dust collection dominate. A linear workflow and generous infeed and outfeed zones matter most.
Garage Workshop for Cars and Repairs
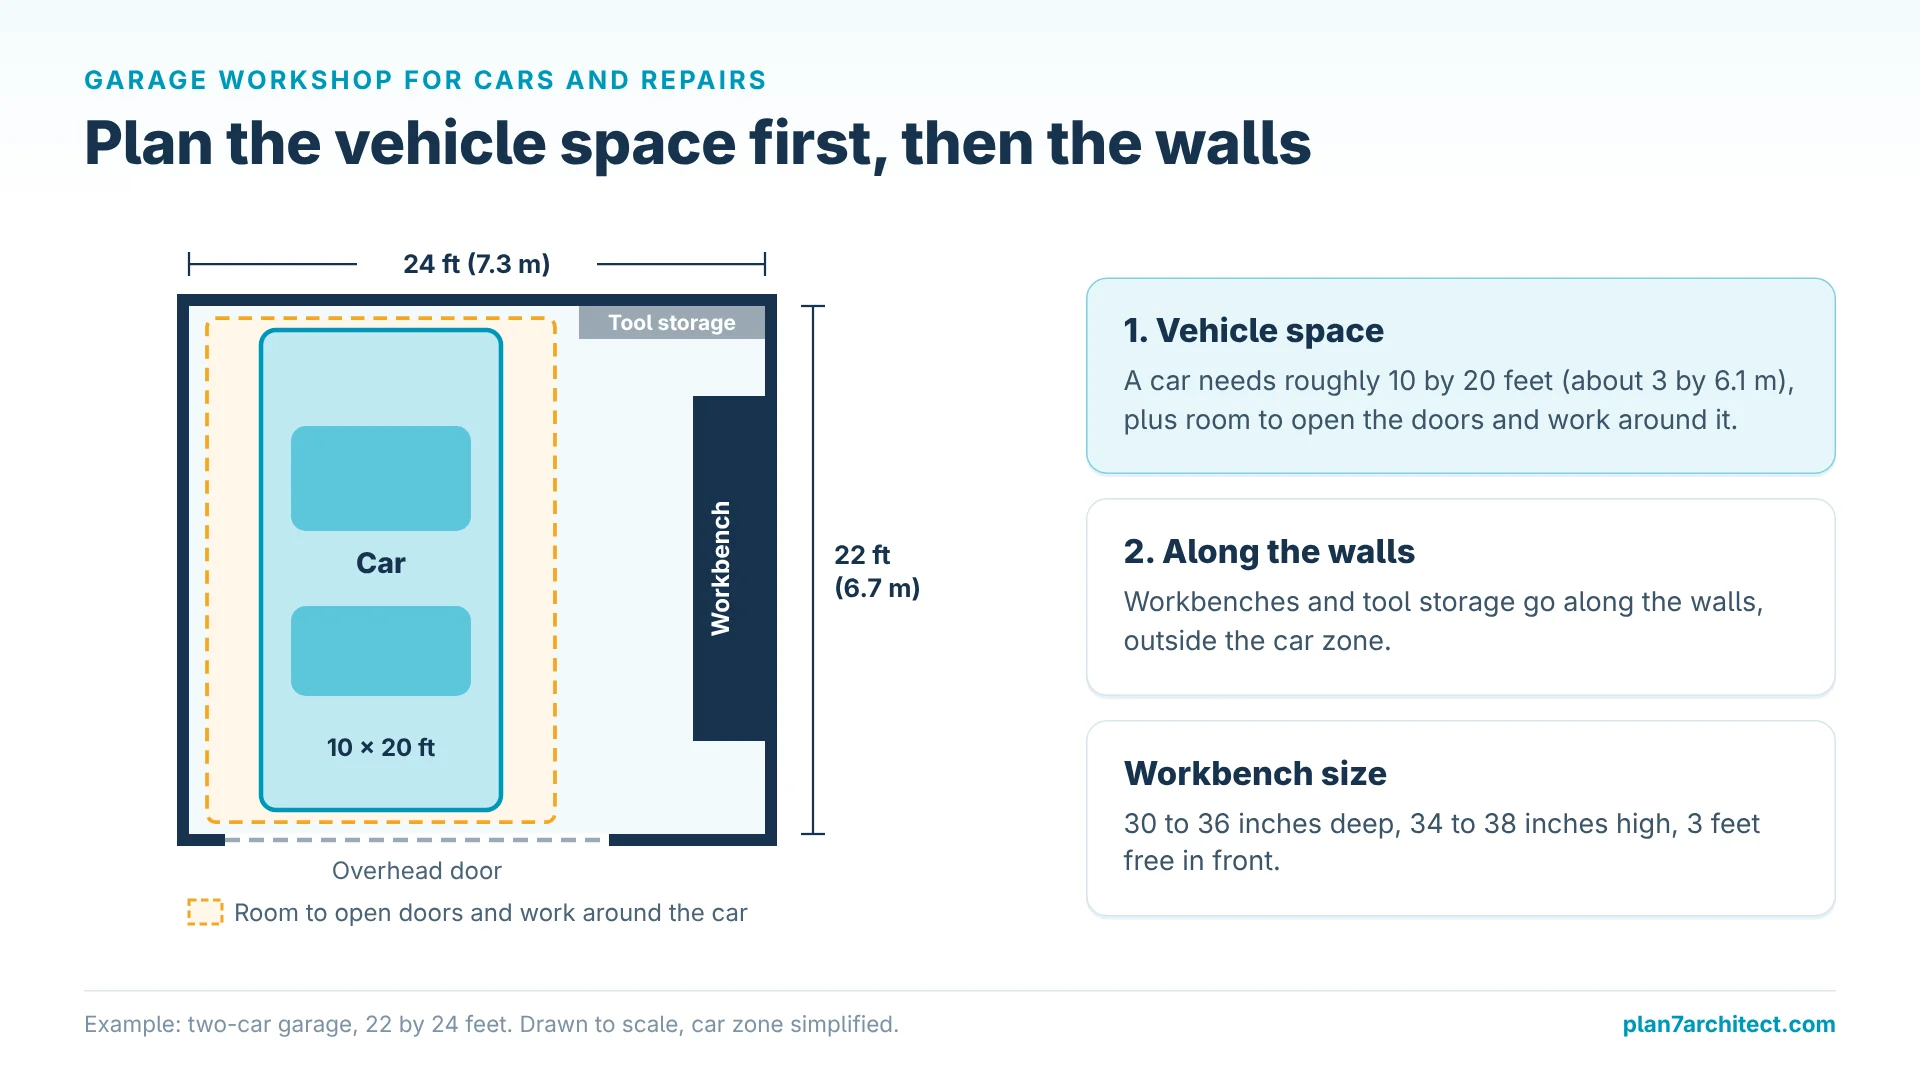
Plan the vehicle space first: a car needs roughly 10 by 20 feet (about 3 by 6.1 m) plus room to open doors and work around it. Workbenches and tool storage go along the walls.
Metal and Small Industrial Workshops
Welding areas need distance from flammable materials and good ventilation. Heavy machines may need reinforced slabs, which belong in the foundation plan of a new building.
Hobby and Craft Workshops
Smaller tools, more storage and good daylight. Windows on the north side give even light for detailed work in the northern hemisphere.
Common Mistakes in Workshop Layouts
Placing Machines Against Walls
A machine pushed against a wall loses its infeed or outfeed side. Leave room for the material, not only for the tool.
Too Few Outlets
In my experience, almost every workshop owner wishes they had planned more outlets. Put them at bench height and in the ceiling for drop cords.
No Space for Assembly
Building a cabinet needs open floor space. Keep an assembly area free, or plan a mobile assembly table.
Plan Your Workshop with Plan7Architect
With Plan7Architect Pro you can plan a workshop completely: the building with walls, doors, windows, roof and foundation, or a room in your garage or basement, plus benches, shelving and machines at real size, clearance zones on layers and outlets and lighting in the electrical plan. Check every layout in 3D, compare variants, and work in feet and inches or metric units. Export the plans as PDF, DWG or DXF for your electrician or builder. You pay Original price was: $259.99.$99.99Current price is: $99.99. once, without a subscription. Every purchase includes a 14-day right of withdrawal, so you can simply cancel your purchase by email if the software is not right for you.

Plan your project with Plan7Architect

Plan7Architect Pro 5 for Original price was: $259.99.$99.99Current price is: $99.99.
You don’t need any prior experience because the software has been specifically designed for beginners. The planning process is carried out in 5 simple steps:
1. Draw Walls

2. Windows & Doors

3. Floors & Roof

4. Textures & 3D Objects

5. Plan for the Building Permit

6. Export the Floor Plan as a 3D Model for Twinmotion

- – Compliant with international construction standards
- – Usable on 3 PCs simultaneously
- – Option for consultation with an architect
- – Comprehensive user manual
- – Regular updates
- – Video tutorials
- – Millions of 3D objects available
Why 85,000+ Home Planners Choose Plan7Architect
Why choose Plan7Architect over other home design tools?
Watch how a complete house is planned from start to finish – in under 25 minutes
Detailed House Planning (25 Min)

Small Home Planning Demo (12 Min)

Short House Planning Demo (6 Min)

The 3 Plan7Architects

Suitable for small hobby projects
No garden planning and only limited floor plan creation with few wall types
★★★★★

For medium-sized projects
Unrestricted floor plan creation & garden planning
No export options for your architect and no plans for building permit applications
★★★★★
For projects of any size
Import & export for working with an architect
Create plans for real building permit applications
Much larger range of features than the other two versions
★★★★★
Verified Customer Reviews
More on this topic: House Design Software: Comparisons & Alternatives – all articles
You might also like: