If you want to plan a ground floor layout yourself using 3D CAD software, the process is easier and more intuitive than most people think. Based on my own experience planning several layouts, here’s how you can do it efficiently:
-
Launch your CAD software – In this case, Plan7Architect is highly recommended.
-
Start a new project and define your measurement system. You can work with either metric (meters, centimeters) or imperial (feet, inches) units.
-
Set the outer dimensions of your ground floor according to your lot size or renovation needs.
-
Draw the external walls, then divide the space by adding interior walls.
-
Add doors and windows from the catalog and place them where needed.
-
Define rooms by naming them (e.g., kitchen, living room, bathroom).
-
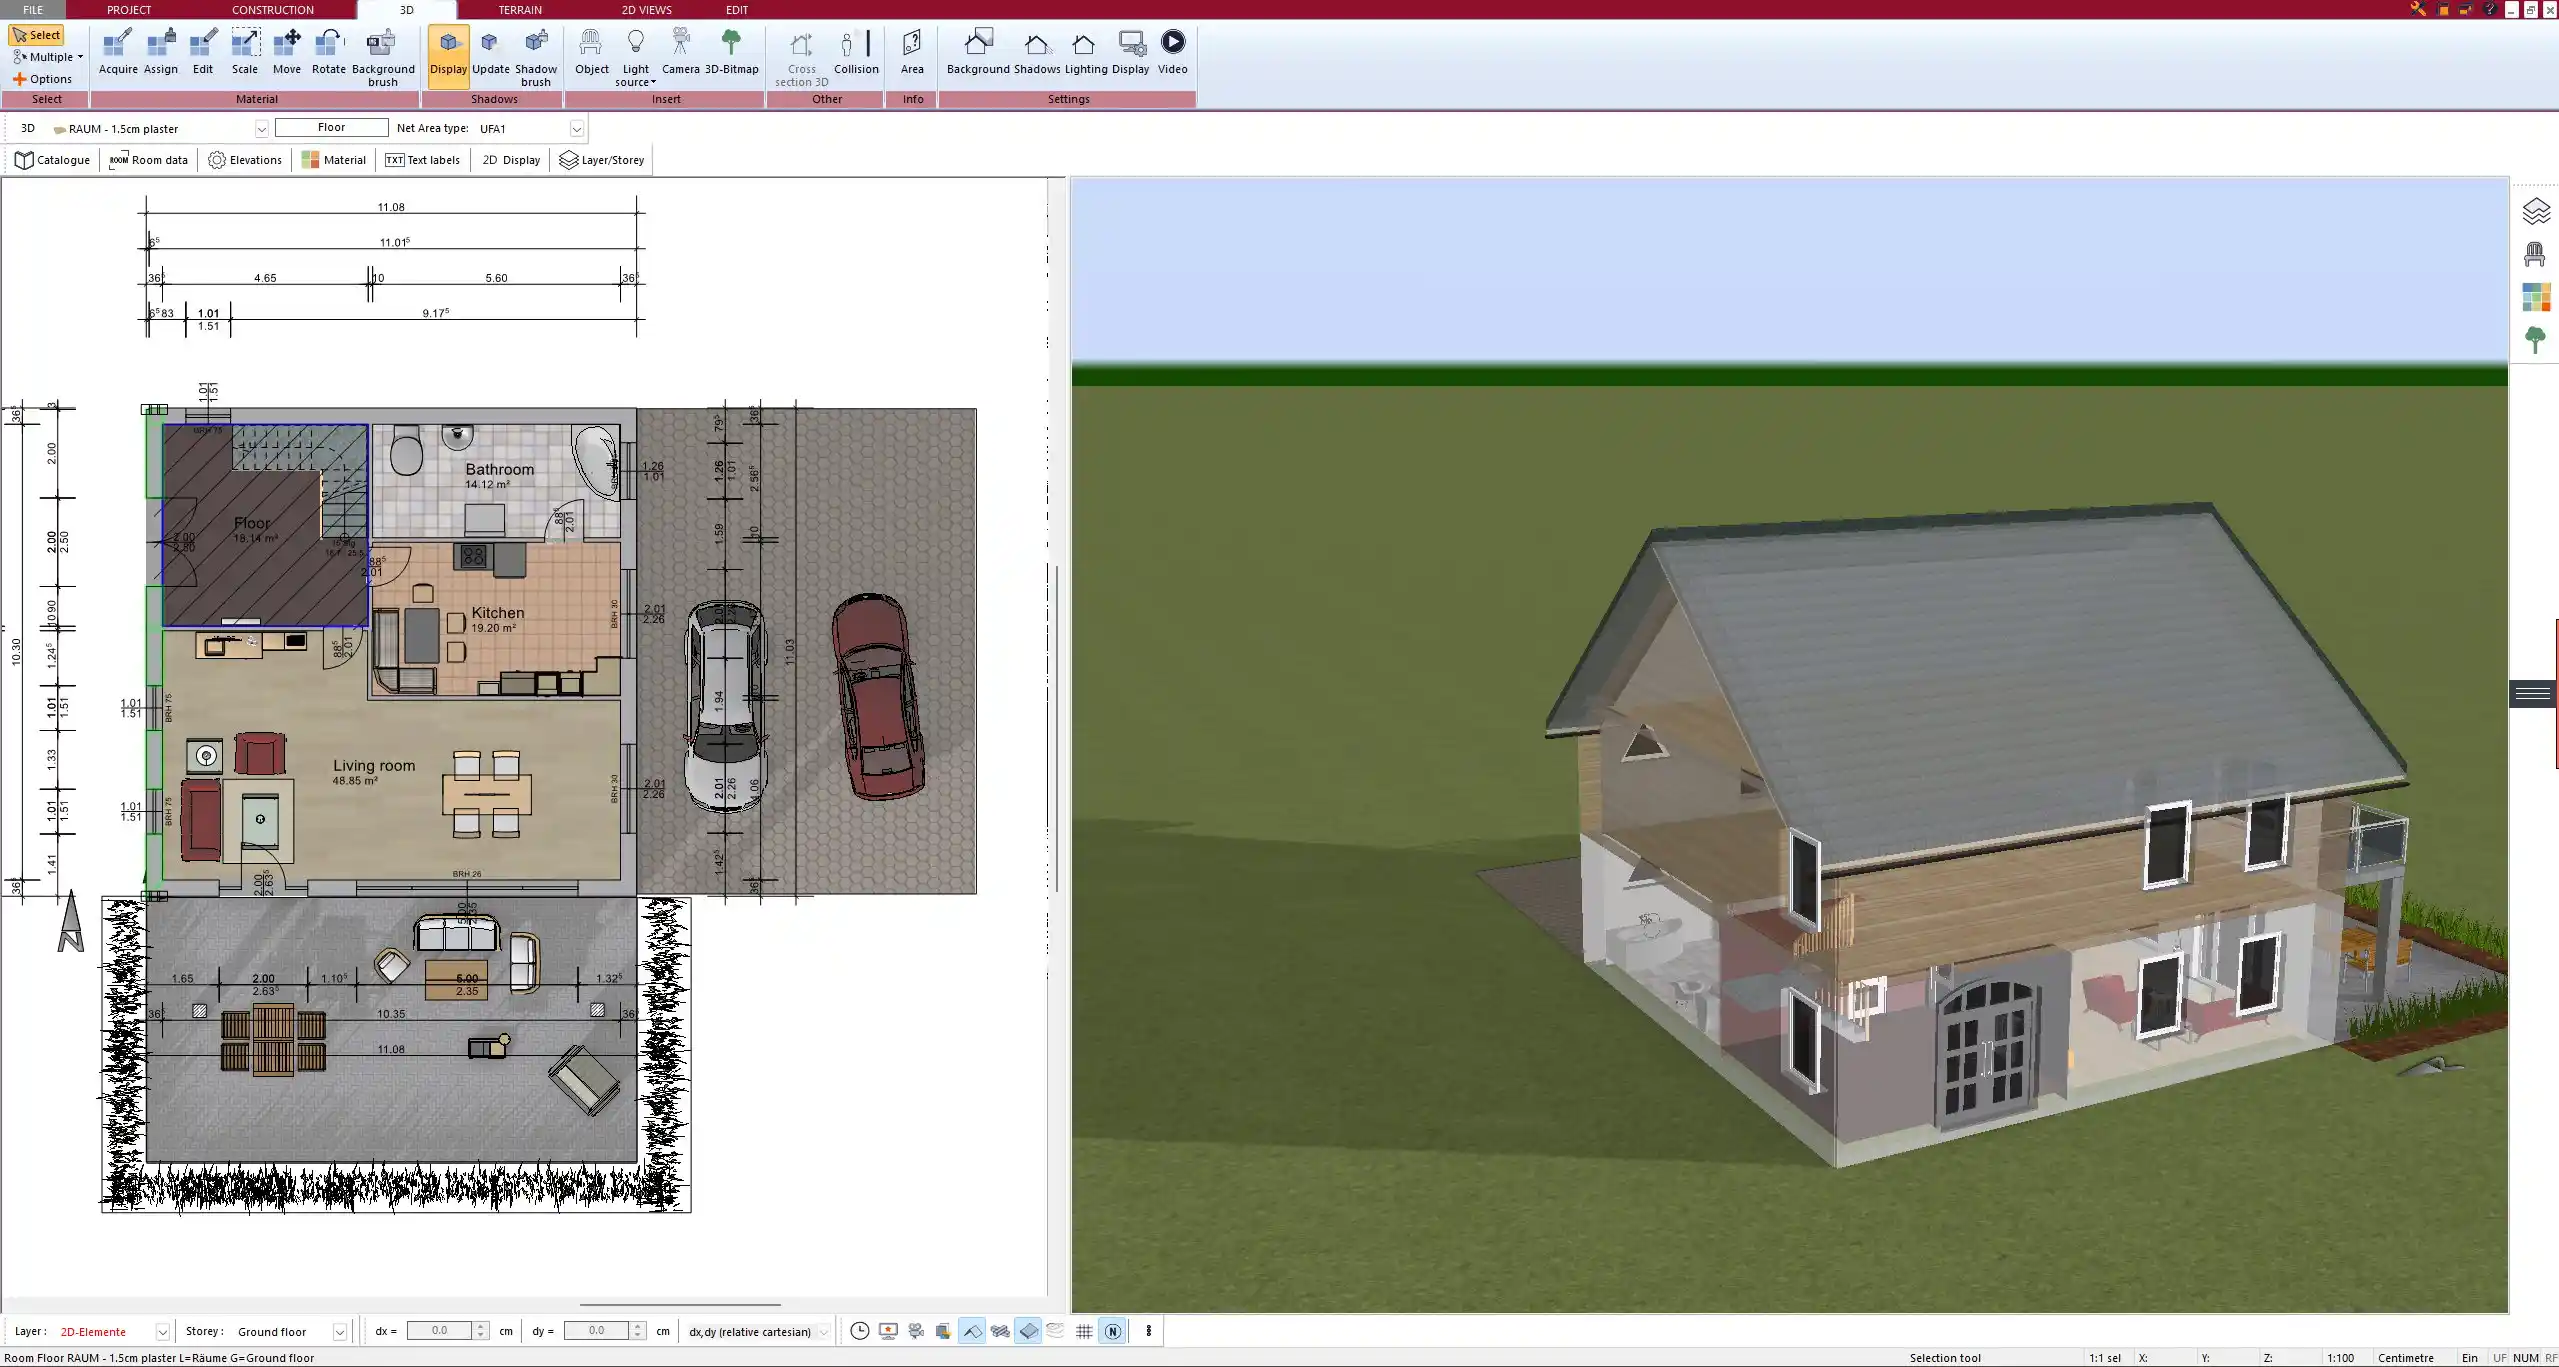
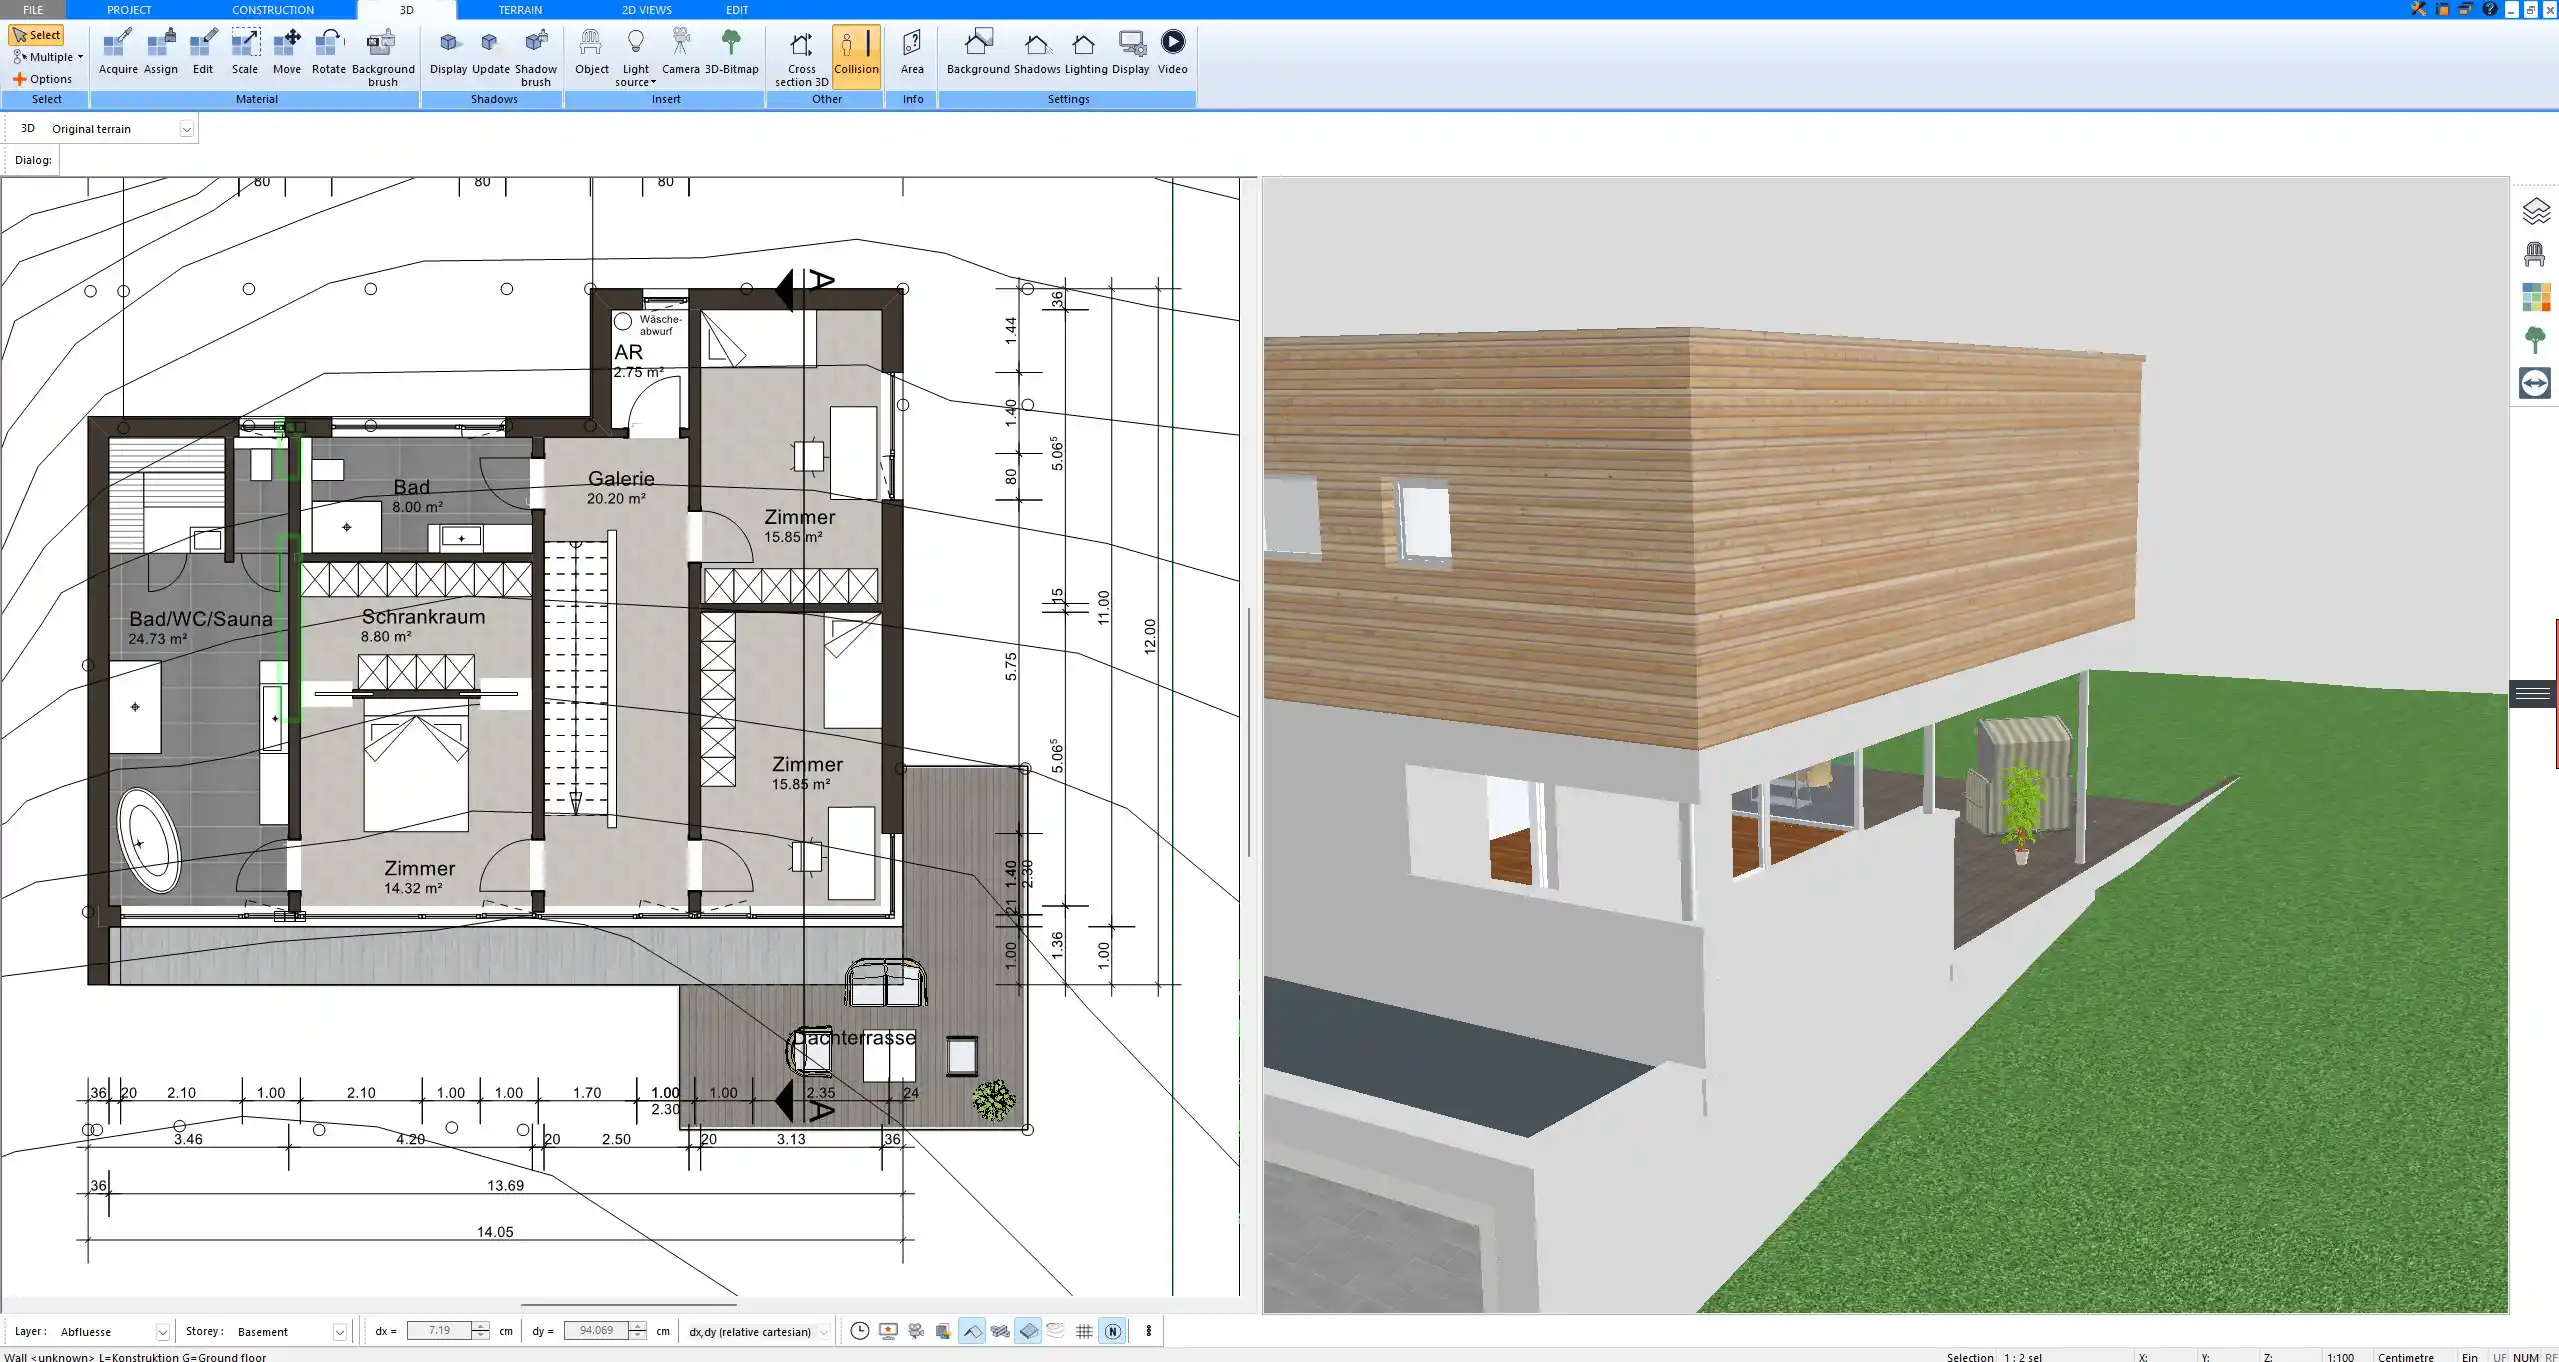
Switch to the 3D view regularly to see how the rooms connect and how the space feels.
-
Adjust dimensions, placements, and proportions until it meets your needs.
-
Save, export or print your layout in 2D and 3D.
The Plan7Architect software makes it especially easy by letting you instantly switch between unit systems and view both 2D technical and 3D visual plans in real time.
What Makes a Good Ground Floor Plan?
Functional Room Arrangement
A successful ground floor layout always starts with smart functional zoning. Think about how you move through the space every day. For example, the kitchen should be near the entrance or garage if you carry groceries in often. Bathrooms should ideally be close to living areas, but not directly visible from the main entrance. The living and dining rooms should connect fluidly.
Here’s a quick list of practical functional layout rules I always follow:
-
Keep the kitchen near the entrance or garage
-
Place the living room toward the garden or backyard
-
Ensure bathrooms are accessible without crossing private zones like bedrooms
-
Avoid long or narrow corridors that waste valuable space
Orientation and Natural Light
The placement of rooms should also consider natural light and solar orientation. South-facing windows (in the Northern Hemisphere) or north-facing ones (in the Southern Hemisphere) help maximize daylight and reduce energy usage.
| Room | Ideal Placement for Light |
|---|---|
| Living Room | South/Southwest |
| Kitchen | East/Southeast |
| Bedrooms | East/Northeast |
| Utility Rooms | North |
If you use Plan7Architect, you can simulate shadows throughout the day, making it easy to test how sunlight enters each room.
Accessibility and Movement
You should be able to move naturally between rooms without hitting dead ends or sharp corners. Doors should open into free space and allow for furniture movement. Hallways should be wide enough to walk comfortably, especially if people will pass through with bags, strollers, or wheelchairs.
-
Minimum recommended hallway width:
-
EU standard: 1 meter
-
US standard: 3 feet
-
Tip: Always test movement paths in 3D mode to spot potential bottlenecks that might not be obvious in 2D.
Advantages of Using 3D CAD Software for Ground Floor Planning
Planning manually with pen and paper can be limiting. With 3D CAD software, the planning experience becomes visual, dynamic, and more accurate.
Key advantages include:
-
Real-time 3D visualization of rooms, furniture, and movement paths
-
Instant switching between 2D floorplans and realistic 3D models
-
Precise area calculations for living space, room sizes, and more
-
Flexible wall thickness and dimensions, fully customizable
-
Furniture and object libraries to quickly place items in the plan
-
Layering tools to organize structure, furniture, lighting, and text separately
I personally found that planning in 3D helped me avoid layout mistakes I wouldn’t have noticed until the house was built.

Common Mistakes to Avoid
Even with good tools, there are mistakes that many people – including myself in early projects – tend to make.
Here are the most common ones:
-
No future planning – Not accounting for growing families, working from home, or aging in place.
-
Improper plumbing layout – Bathrooms and kitchens far from water lines increase costs.
-
Unrealistic room sizes – Rooms too small for real furniture or too large to heat efficiently.
-
Poor flow between rooms – Doors in the wrong place or spaces too open or too closed off.
-
Ignoring outdoor access – Especially in single-floor layouts, patios or garden exits matter.
Tip: After creating your initial layout, do a virtual 3D walkthrough in Plan7Architect. That’s when issues often reveal themselves.
Tips for Optimizing Your Ground Floor Plan
After going through dozens of layout revisions over time, I’ve developed some best practices that save time and deliver better results:
-
Sketch your ideas roughly on paper before using the software
-
Define furniture early – knowing where beds, tables, or sofas will go helps with wall and window placement
-
Use different layers – one for architecture, one for furniture, one for electrical planning, etc.
-
Set wall heights and window sizes to reflect real proportions
-
Save multiple layout versions to compare ideas easily
Tip: Use Plan7Architect’s duplication tool to create layout variations side by side.
Best Software for Ground Floor Planning (Why Plan7Architect?)
When comparing 3D CAD software options, Plan7Architect stands out for both beginners and advanced users. I’ve used several tools over the years, but this one offered the best balance between ease of use and professional-grade output.
Here’s why it works so well:
| Feature | Plan7Architect |
|---|---|
| Units supported | Metric (m, cm) + Imperial (ft, in) |
| 2D + 3D switch | Instantly available |
| Furniture & object library | Large and expandable |
| Learning curve | Beginner-friendly |
| Ideal user | Private builders & professionals |
| One-time purchase | Yes, no subscription required |
| Platform compatibility | Windows |
The software’s interface is clean and modern, and the support team was quick to respond when I had questions during my first project.
Exporting and Sharing Your Ground Floor Plan
Once your plan is finished, you’ll want to either print it or share it with someone – an architect, a builder, or your family.
With Plan7Architect, exporting is simple:
-
2D plans can be exported as PDF, DWG, or image files
-
3D visuals can be saved as static images or videos
-
Walkthroughs can be presented interactively
-
Measurements are displayed in the unit system of your choice
You can also print technical views to scale, complete with wall thicknesses, measurements, and furniture outlines.
Tip: For building permits, always use the software’s built-in scale settings and include all required structural data layers.
Professional Floor Plans with Plan7Architect
If you want to create a professional ground floor layout on your own, Plan7Architect is an excellent choice. The software lets you plan in both 2D and 3D, work with either metric or imperial units, and offers an intuitive drag-and-drop interface for walls, furniture, windows, and more. Even if you’re not a trained architect, you can produce accurate, detailed floor plans.
There’s no subscription – just a one-time license with a full 14-day cancellation policy. If you’re not satisfied, you can cancel your purchase by sending a simple email. It’s a flexible and powerful tool for anyone planning a ground floor layout for a new home or renovation.
Plan your project with Plan7Architect

Plan7Architect Pro 5 for $99.99
You don’t need any prior experience because the software has been specifically designed for beginners. The planning process is carried out in 5 simple steps:
1. Draw Walls

2. Windows & Doors

3. Floors & Roof

4. Textures & 3D Objects

5. Plan for the Building Permit

6. Export the Floor Plan as a 3D Model for Twinmotion

- – Compliant with international construction standards
- – Usable on 3 PCs simultaneously
- – Option for consultation with an architect
- – Comprehensive user manual
- – Regular updates
- – Video tutorials
- – Millions of 3D objects available


