With the Plan7Architect software, planning a gable roof in both 2D and 3D is straightforward, even without previous design experience. You can select a predefined gable roof structure, customize pitch, slope, overhangs, materials, and ridge height, and immediately visualize every change in a realistic 3D view alongside your 2D floor plan. The interface is intuitive and built to be practical for private builders, renovators, or small professionals.
You can work entirely in metric units (meters, square meters) or imperial units (feet, inches, square feet) depending on your region. The program supports both without conversions, and you can switch between them in the settings.
Main functions at a glance:
-
Selection of gable roof templates
-
Custom adjustment of roof angle, height, and overhangs
-
Real-time 3D preview during 2D editing
-
Compatible with both metric and imperial measurement systems
-
No CAD skills required
Whether you’re creating a basic roof sketch or a detailed 3D model, Plan7Architect gives you all the tools to implement your vision accurately and professionally.
Step-by-Step: How to Design a Gable Roof in Plan7Architect
1. Start with Your Floor Plan
Before designing the roof, you need to create or import the basic house layout. You can draw the walls manually in 2D or use an imported scan or blueprint as a guide. Once your building’s ground floor is outlined, define the height of the outer walls. This gives the program the information it needs to calculate ridge height, pitch, and structural logic.
Features you’ll use at this stage:
-
Wall drawing tool
-
Dimension input (metric or imperial)
-
Floor height and ceiling settings
-
Layer visibility (to isolate wall view)
If you’re designing a home with an attic or upper floor, it’s essential to plan this from the beginning, as the gable roof will directly affect internal headroom.
2. Add a Gable Roof in 2D
Once your layout is complete, open the roof menu and select “Gable Roof.” The software will automatically apply a standard gable structure to the building. From there, you can start modifying it according to your preferences and the structural needs of your region.
Modifiable roof attributes include:
| Feature | Description |
|---|---|
| Roof pitch/slope | Adjustable by degrees or ratio (e.g. 30° or 6:12 pitch) |
| Ridge height | Automatically calculated or set manually |
| Overhang (eaves) | Defined on each side independently |
| Orientation | Rotate roof alignment to match building angle |
| Edge thickness | Set visual framing or realistic construction edge thickness |
You can use either symmetrical or asymmetrical slopes if your design calls for a more individual look. For example, rural-style barns often use extended gable ends, while minimalist designs may opt for reduced overhangs.
Tip:
If you plan to build in a region with snow or heavy rainfall, adjust the pitch higher for better runoff. The Plan7Architect lets you increase the angle easily and updates the 3D view immediately.
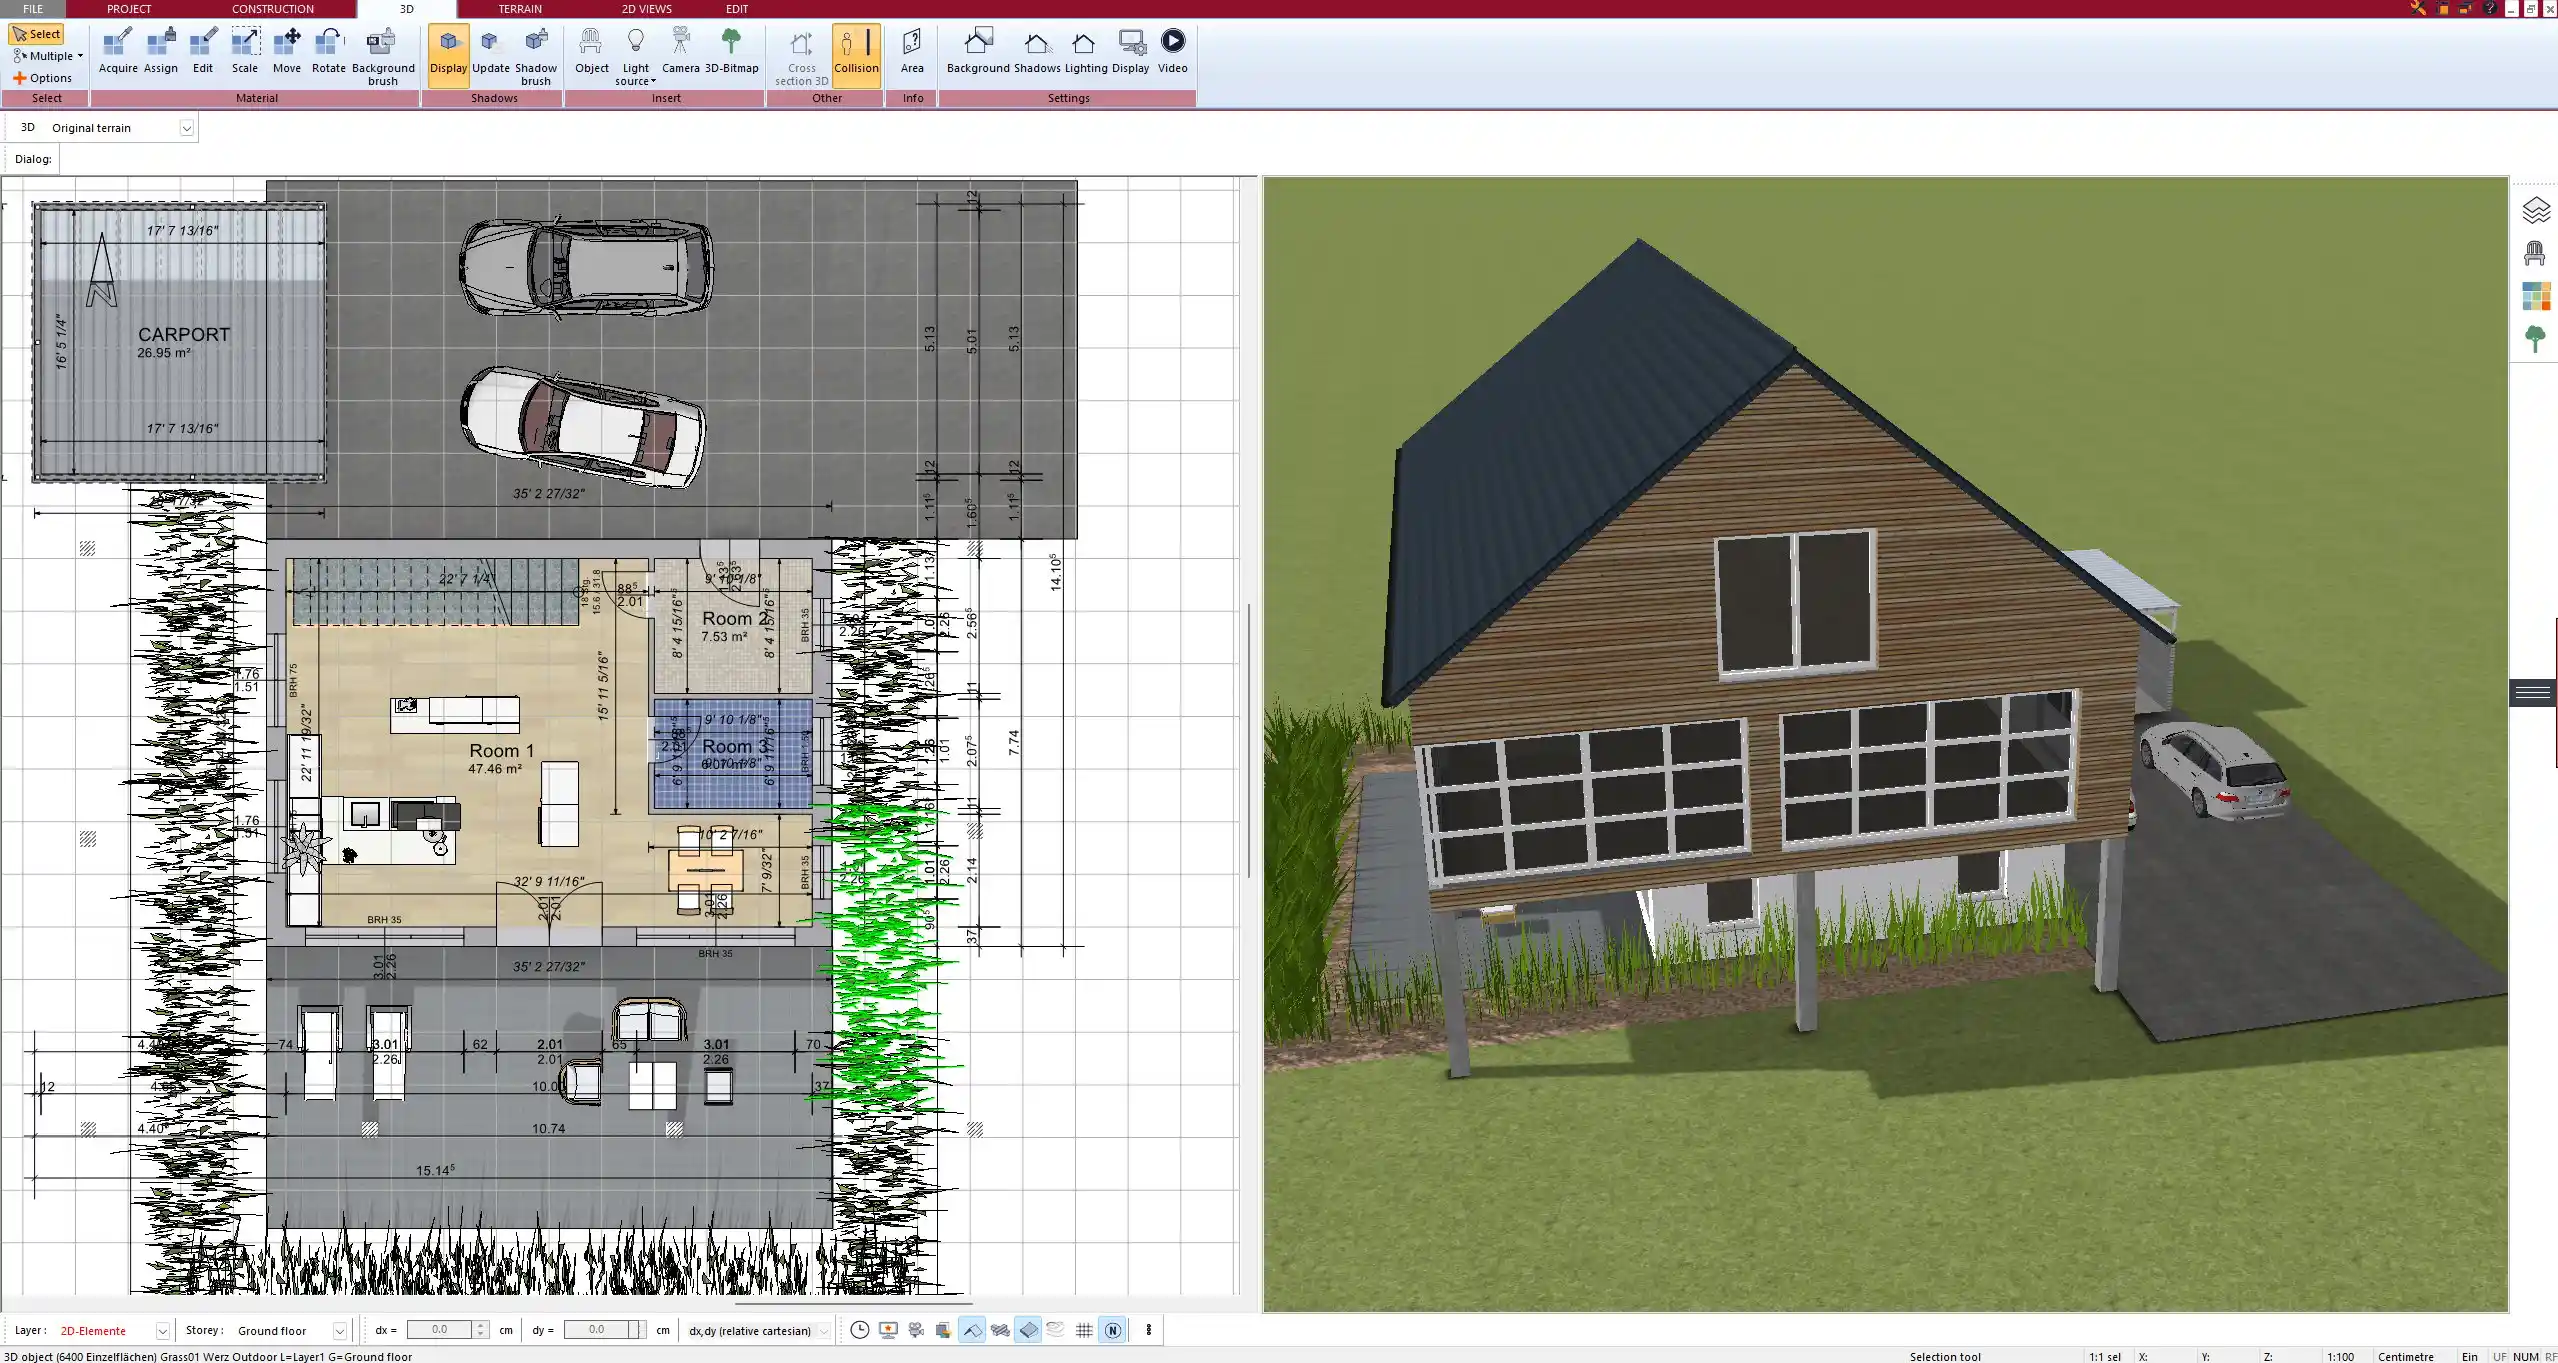
3. Fine-Tune in 3D View
Switching to the 3D view allows you to inspect every element of the gable roof in real time. You can walk around the building, view it from inside and outside, and test different lighting scenarios. Every adjustment in the 2D plan is instantly visible in 3D, so you’ll never lose track of what your final result will look like.
You can drag the ridge line to alter its height, stretch eaves visually, or adjust slopes without entering numerical values – but you can also input exact numbers if required.

Functions available in 3D mode:
-
Orbit, zoom, and section views
-
Real-time lighting and shadow display
-
Drag-and-drop surface changes (e.g. change roofing material)
-
Ceiling visibility toggles for interior inspection
-
Individual part selection (e.g. highlight only one side of the gable)
This view is also ideal for checking proportions and the impact of the roof on the overall structure. If you’re including living space beneath the gable, this is where you’ll test headroom and visibility.
4. Use Measurement Tools & Unit Settings
All dimensions in Plan7Architect can be set in either metric or imperial units, depending on your preference. You can toggle this in the global settings before you start or during the process. This makes the software especially useful for international users or cross-border projects.
What you can measure and define:
-
Roof height, angle, surface area
-
Wall and floor connections
-
Overhang length per side
-
Total covered area for energy planning or permissions
If your project requires submission to local authorities, you can generate technical sheets and views with precise labels in your preferred measurement system.
Benefits of Using Plan7Architect for Gable Roof Planning
Planning a gable roof manually or in traditional CAD programs often requires technical knowledge and a lot of time. Plan7Architect removes that barrier and lets you focus on the design.
Why this program is ideal for gable roofs:
-
Drag-and-drop elements with smart snapping
-
Instant preview of all changes
-
Integrated 3D and 2D workspaces
-
Custom roof materials from built-in texture libraries
-
No engineering background needed
You can combine structural accuracy with creative freedom, which makes the software highly effective for realistic home planning.
Tips for Realistic Gable Roof Designs
Consider Roof Pitch Based on Climate
Different climates demand different roof pitches. The Plan7Architect allows full control over pitch angle, so you can adapt your design to your region.
General pitch recommendations:
| Climate Type | Suggested Pitch | Description |
|---|---|---|
| Snowy/Mountainous | 35° – 45° or 8:12–12:12 | Allows snow to slide off naturally |
| Rainy Coastal | 30° – 40° or 7:12–9:12 | Prevents water accumulation |
| Dry/Windy | 18° – 30° or 4:12–7:12 | Lower resistance to wind and less material use |
| Hot/Dry (Desert) | 15° – 25° or 3:12–6:12 | Keeps attic space cooler |
These ranges can be entered numerically or selected from presets inside the roof editor.
Align Roof Design with Interior Space
Gable roofs often include livable attic space or cathedral ceilings. With Plan7Architect, you can visualize these directly from within the model and check for usability.
Key considerations:
-
Will the upper floor have sloped ceilings?
-
Do you need dormers or skylights for light and headroom?
-
How high should the ridge be to allow full standing height inside?
Use the section view tool to cut into the roof and test internal clearance. You can also add furniture in 3D to simulate usability of the space under the gable.

Add Dormers, Chimneys, or Skylights
Plan7Architect includes a library of roof elements you can add at any point. These are placed with simple drag-and-drop controls and can be adjusted in shape, size, and position.
Available add-ons include:
-
Gable and shed dormers
-
Round or rectangular skylights
-
Chimneys (brick, stone, or metal)
-
Roof windows
-
Ventilation pipes
These elements update in both 2D and 3D views automatically, and they interact with the roof surface realistically – you don’t need to cut holes or adjust framing manually.
Tip:
Use the sunlight simulation tool to position skylights for maximum daylight exposure, especially in attic rooms or studios.
Export, Share, or Present Your Gable Roof Plan
After designing your gable roof, you can export the project in multiple formats for presentation, construction, or review. All views are customizable, including layer visibility, line thickness, and measurement styles.
Export options include:
-
High-resolution images (JPG, PNG)
-
Printable PDFs with labels
-
3D models for virtual walkthroughs
-
Floor plans with roof structure overlays
This makes it easy to hand off plans to contractors, share with architects, or include in building permit submissions.
You can also save multiple versions of your project, allowing you to test different roof designs side by side before committing.
Plan your project with Plan7Architect

Plan7Architect Pro 5 for $109.99
You don’t need any prior experience because the software has been specifically designed for beginners. The planning process is carried out in 5 simple steps:
1. Draw Walls

2. Windows & Doors

3. Floors & Roof

4. Textures & 3D Objects

5. Plan for the Building Permit

6. Export the Floor Plan as a 3D Model for Twinmotion

- – Compliant with international construction standards
- – Usable on 3 PCs simultaneously
- – Option for consultation with an architect
- – Comprehensive user manual
- – Regular updates
- – Video tutorials
- – Millions of 3D objects available


