If you’re looking to plan a home extension yourself, Plan7Architect is the right tool. With this intuitive software, you can design house additions of any kind—directly on your computer—in both 2D and 3D. Whether you want to add a room, extend the kitchen, build a second floor, or attach a garage, you can visualize and draw it all, without needing prior architectural experience.
You can create detailed construction-ready floor plans, add roofs, windows, and stairs, and walk through your design in real-time 3D. The software supports both metric and imperial units, allowing you to work comfortably regardless of your regional standards.
Here’s what you can do with Plan7Architect when planning your home extension:
-
Design ground-floor, side, rear, or upper-story extensions
-
Model and connect new rooms to the existing structure
-
Set wall thickness, ceiling heights, and roof types
-
Visualize the project in high-quality 3D
-
Print 2D plans with measurements and room labels
-
Export files for use in construction and presentation
Step-by-Step – How to Plan a Home Extension with Plan7Architect
Step 1 – Import or Recreate Your Existing House
You can begin your extension by importing a scanned floor plan of your existing house in formats like PDF or JPG. The software lets you trace over the imported image and recreate the existing layout accurately.
Alternatively, you can build your house layout from scratch using exact measurements. The measurement system is flexible, so you can switch between metric (meters, centimeters) or imperial (feet, inches) units depending on your preference or local building practices.
Step 2 – Add Your Extension
Once the base structure is in place, you can start drawing your extension directly onto the plan. Use the wall tool to define new spaces—whether it’s a new bedroom, a living room expansion, or an attached garage. Define wall types, adjust wall thickness, set ceiling heights, and choose the roof style.
You can freely extend in any direction: side, rear, front, or vertically. The software automatically handles connections and intersections between new and existing walls.
Step 3 – Plan Windows, Doors, and Access
After drawing the structure, place openings such as doors and windows. The catalog offers a wide range of customizable elements you can drag and drop into your plan. You can define the dimensions, opening direction, height from the floor, and style for each component.
Make sure your new rooms are easily accessible from the existing house. Add interior doors or hallway openings where needed. You can also include sliding doors, double doors, or French windows if the extension leads into a garden or patio.
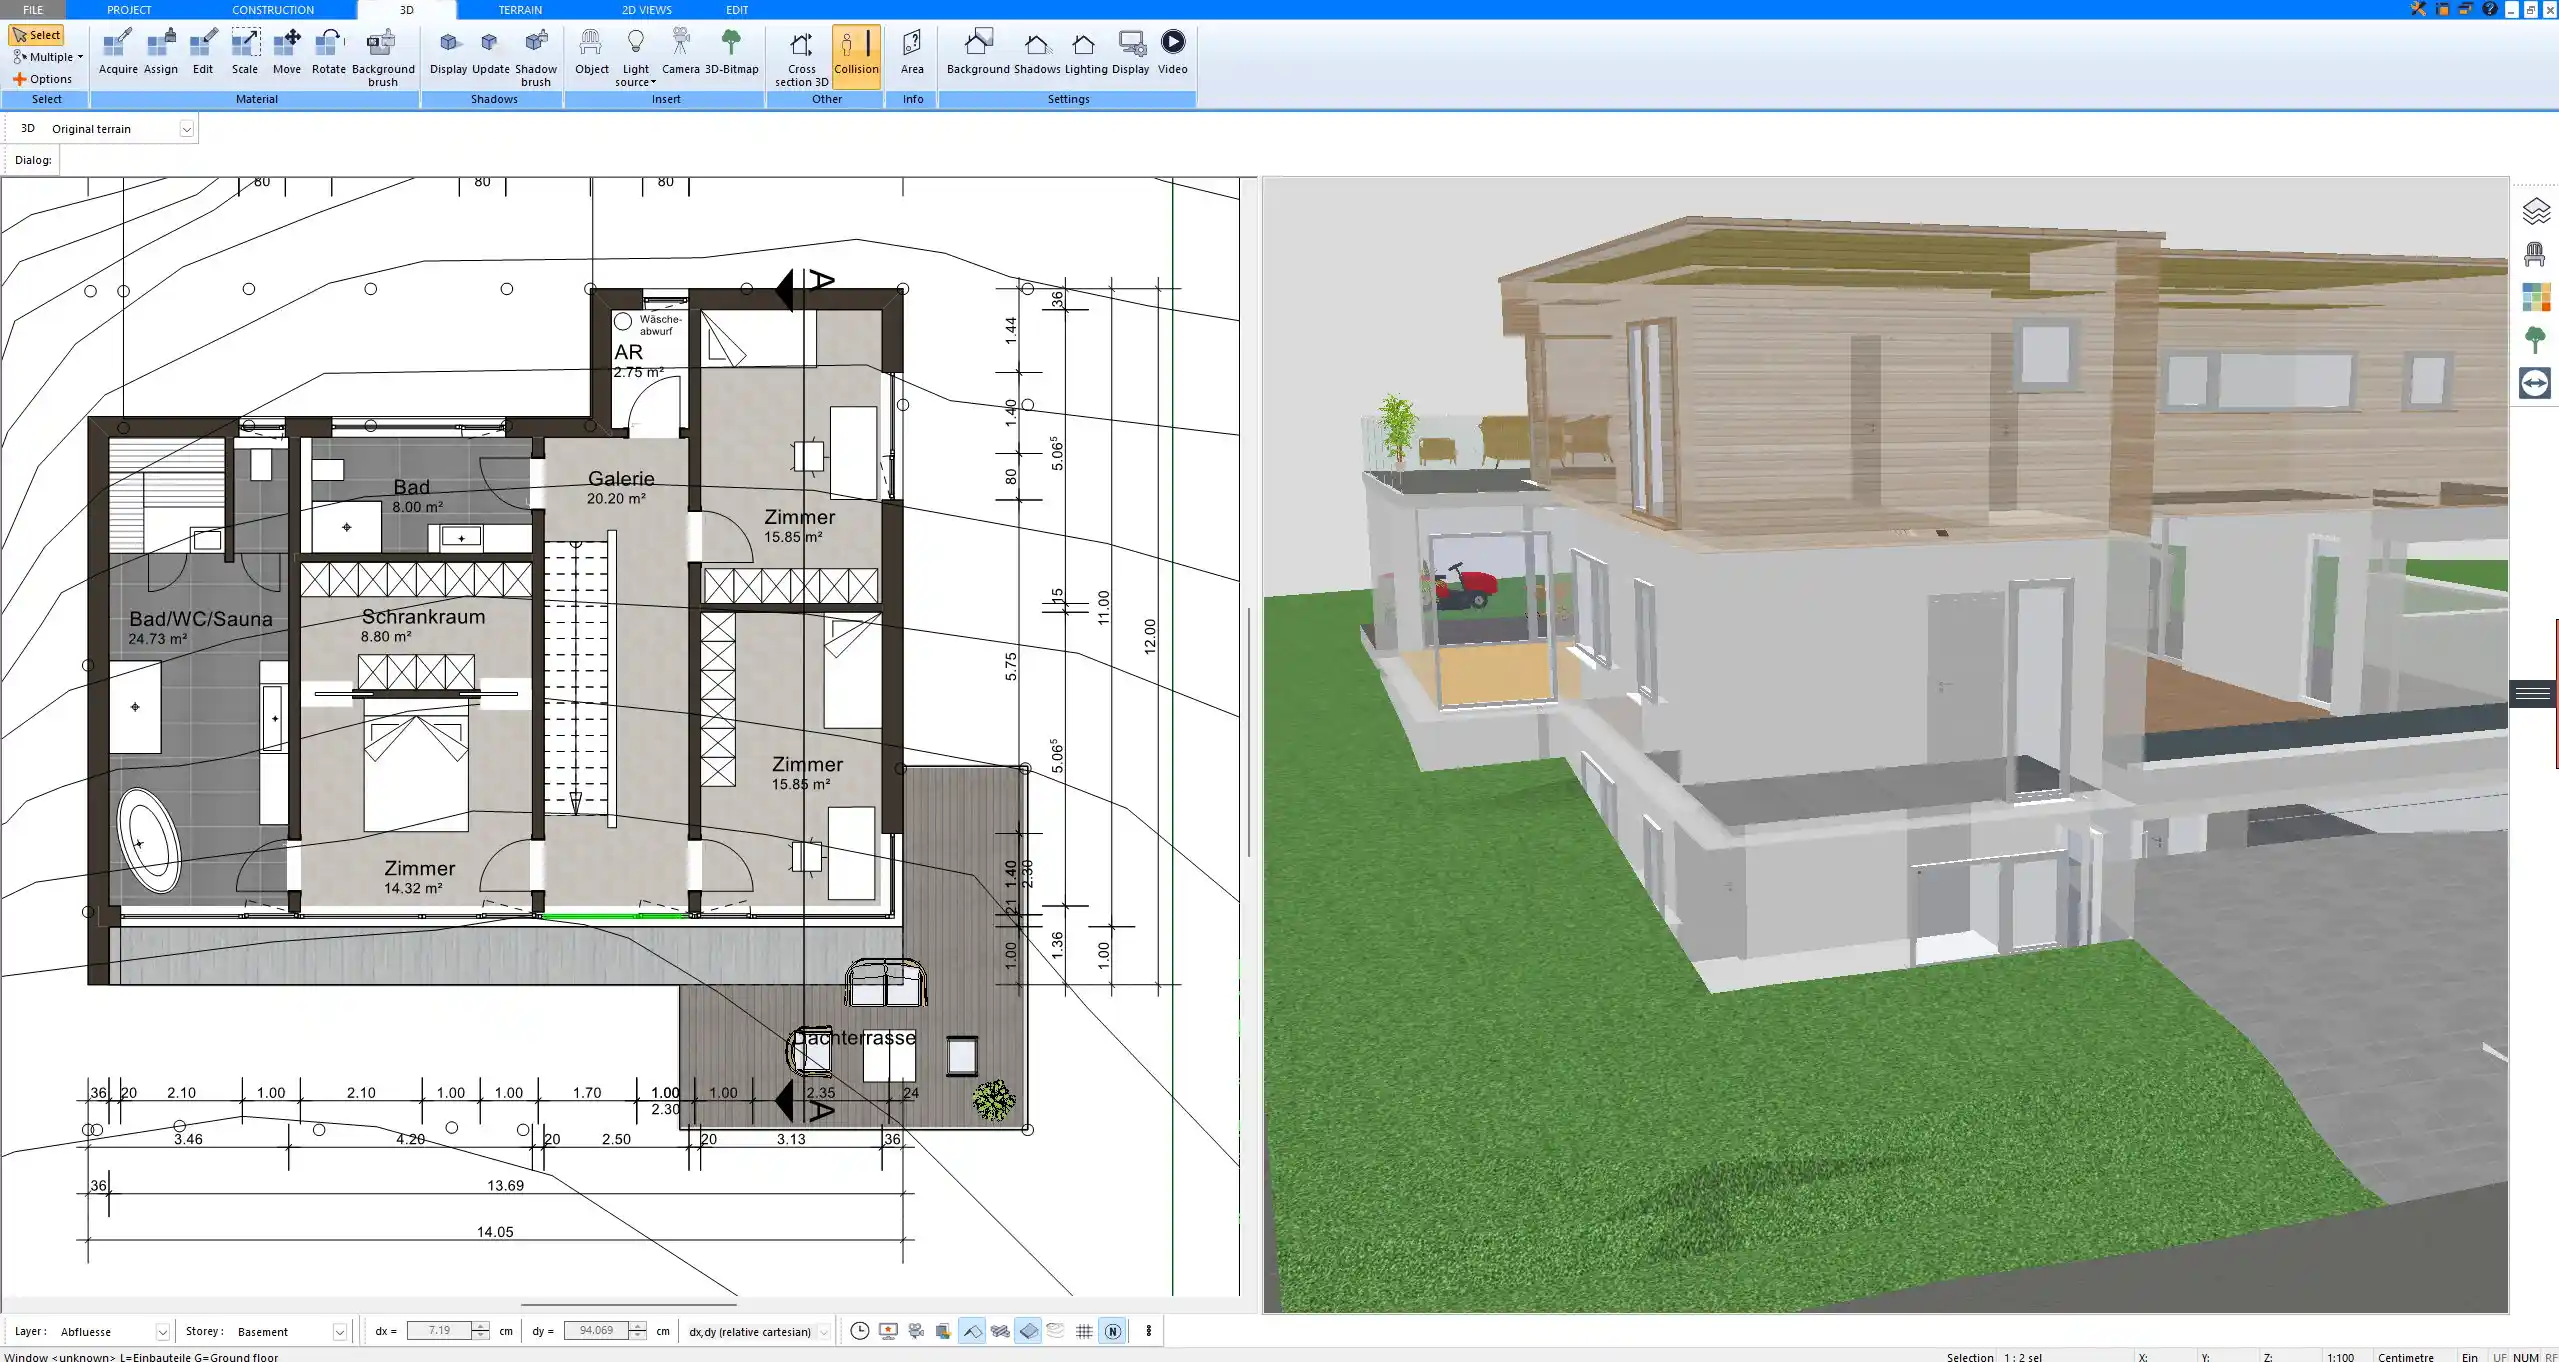
Step 4 – Visualize in 3D
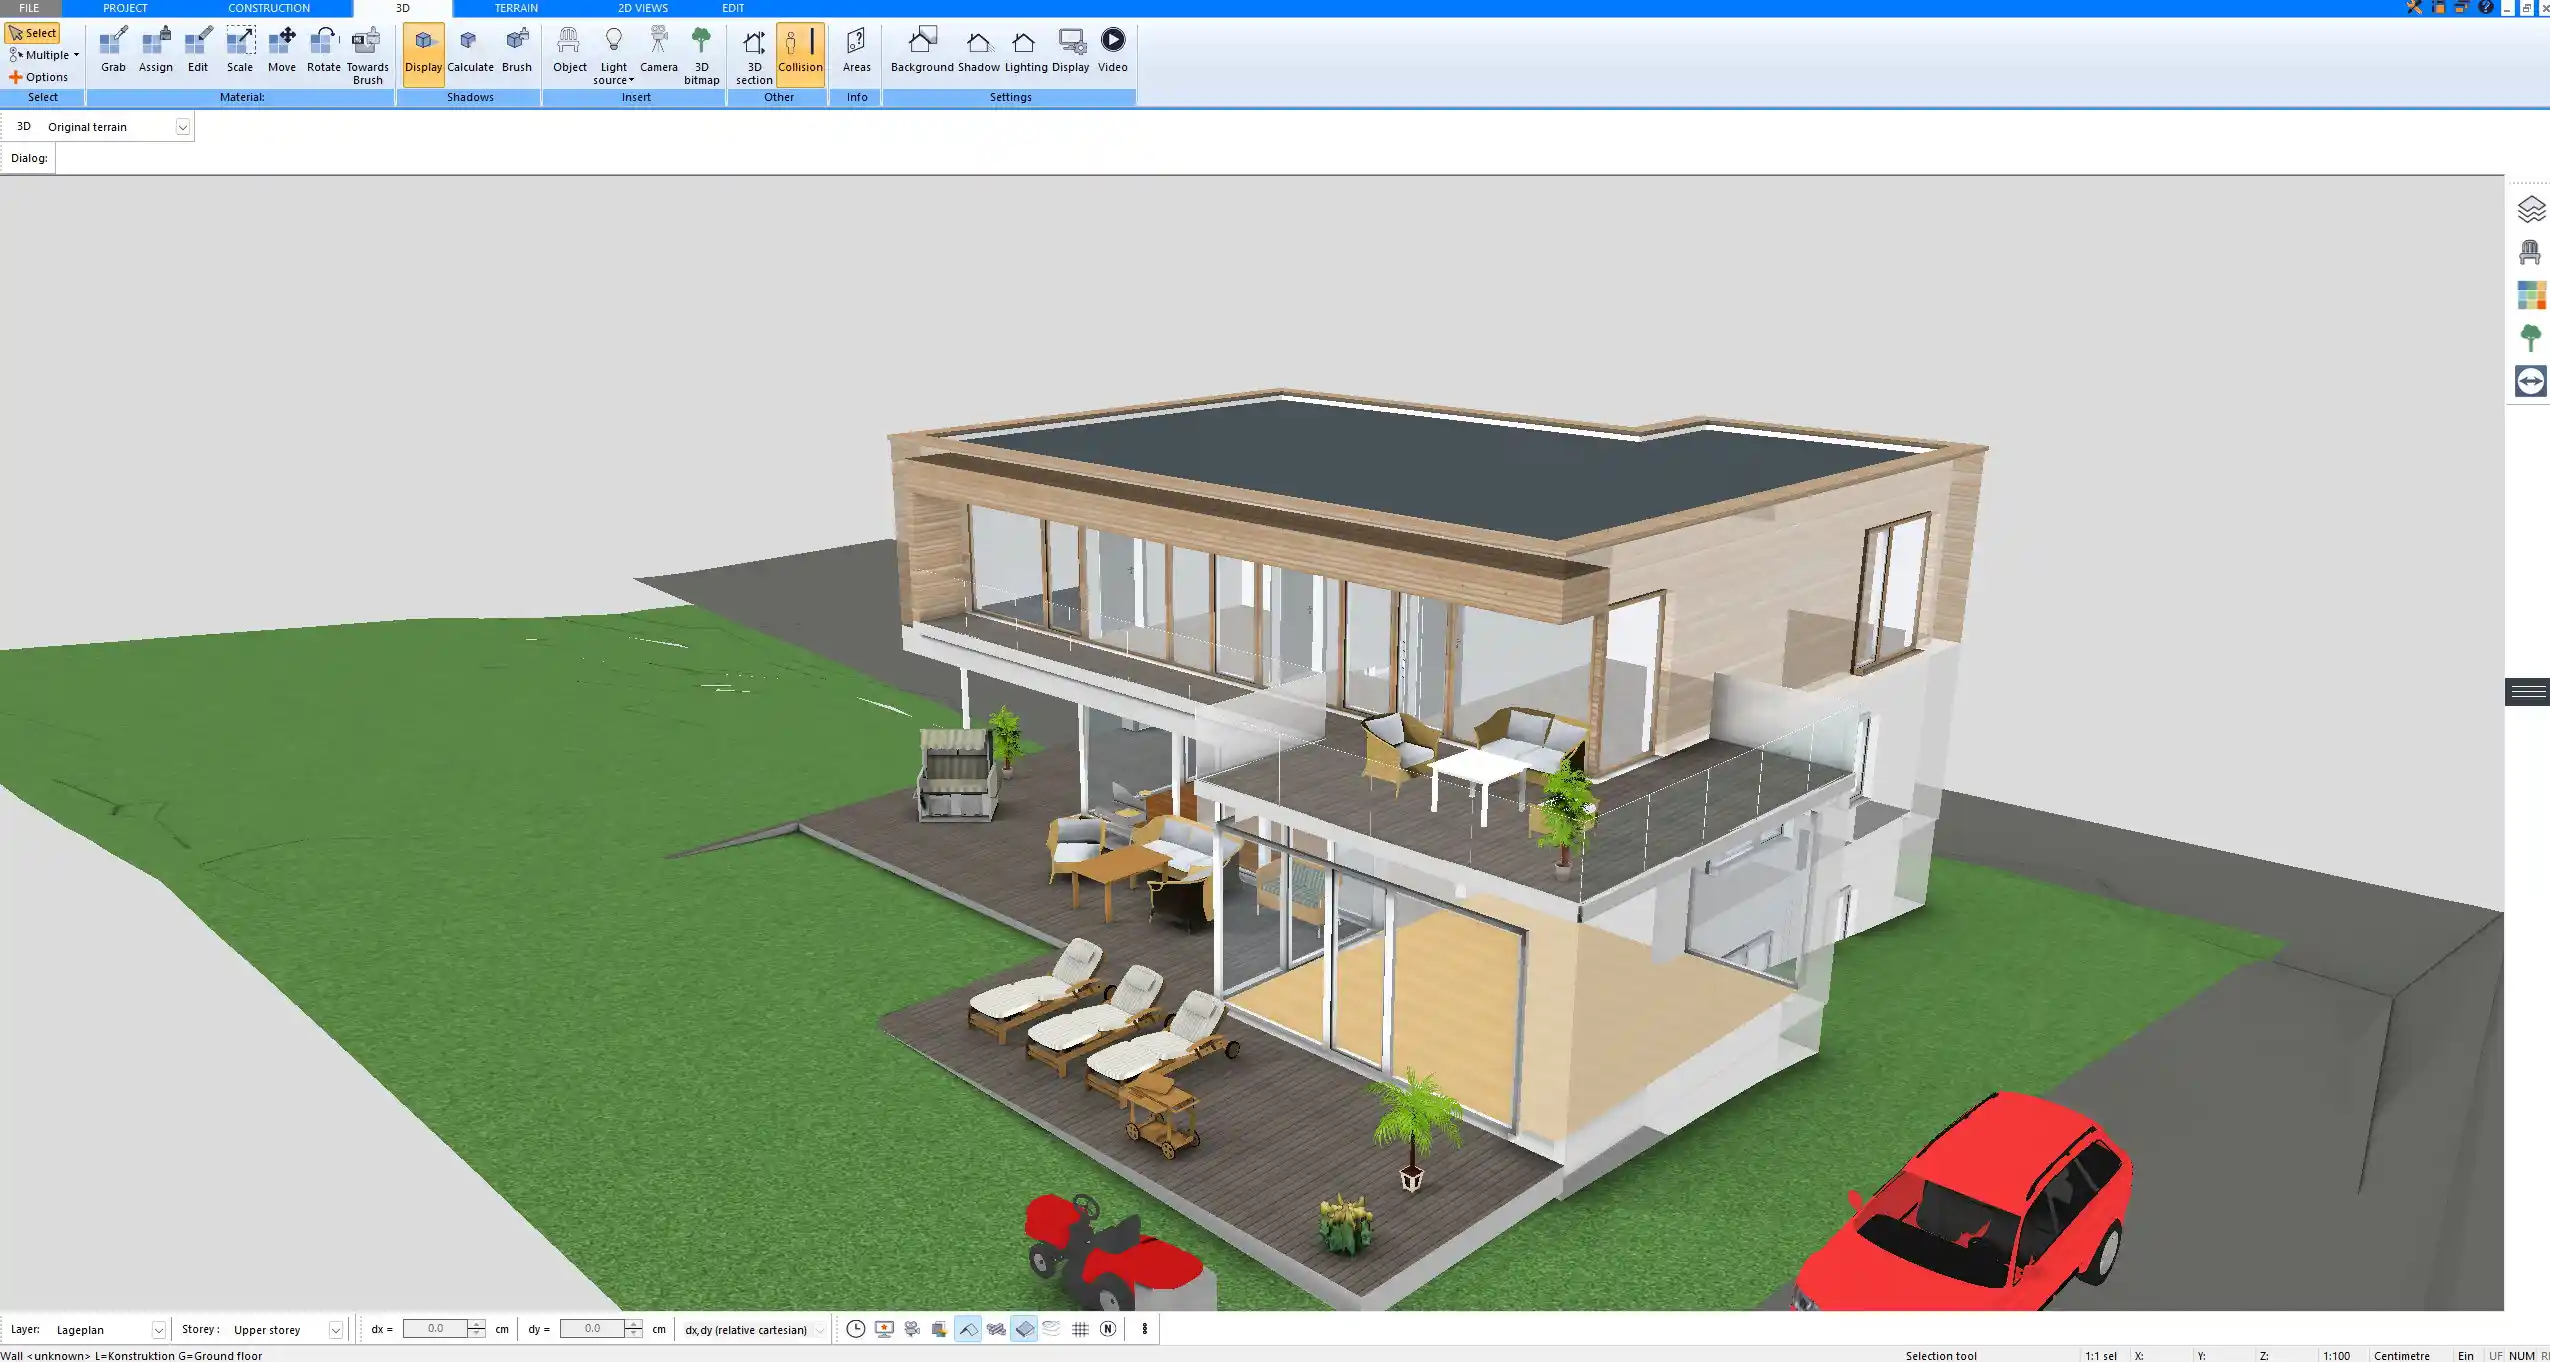
With one click, you can enter 3D mode and explore your extended home from every angle. You can walk through it virtually, view from above, or orbit around it like a 3D model. All structural changes and additions appear in real-time, giving you a full understanding of how the new extension integrates with the existing house.
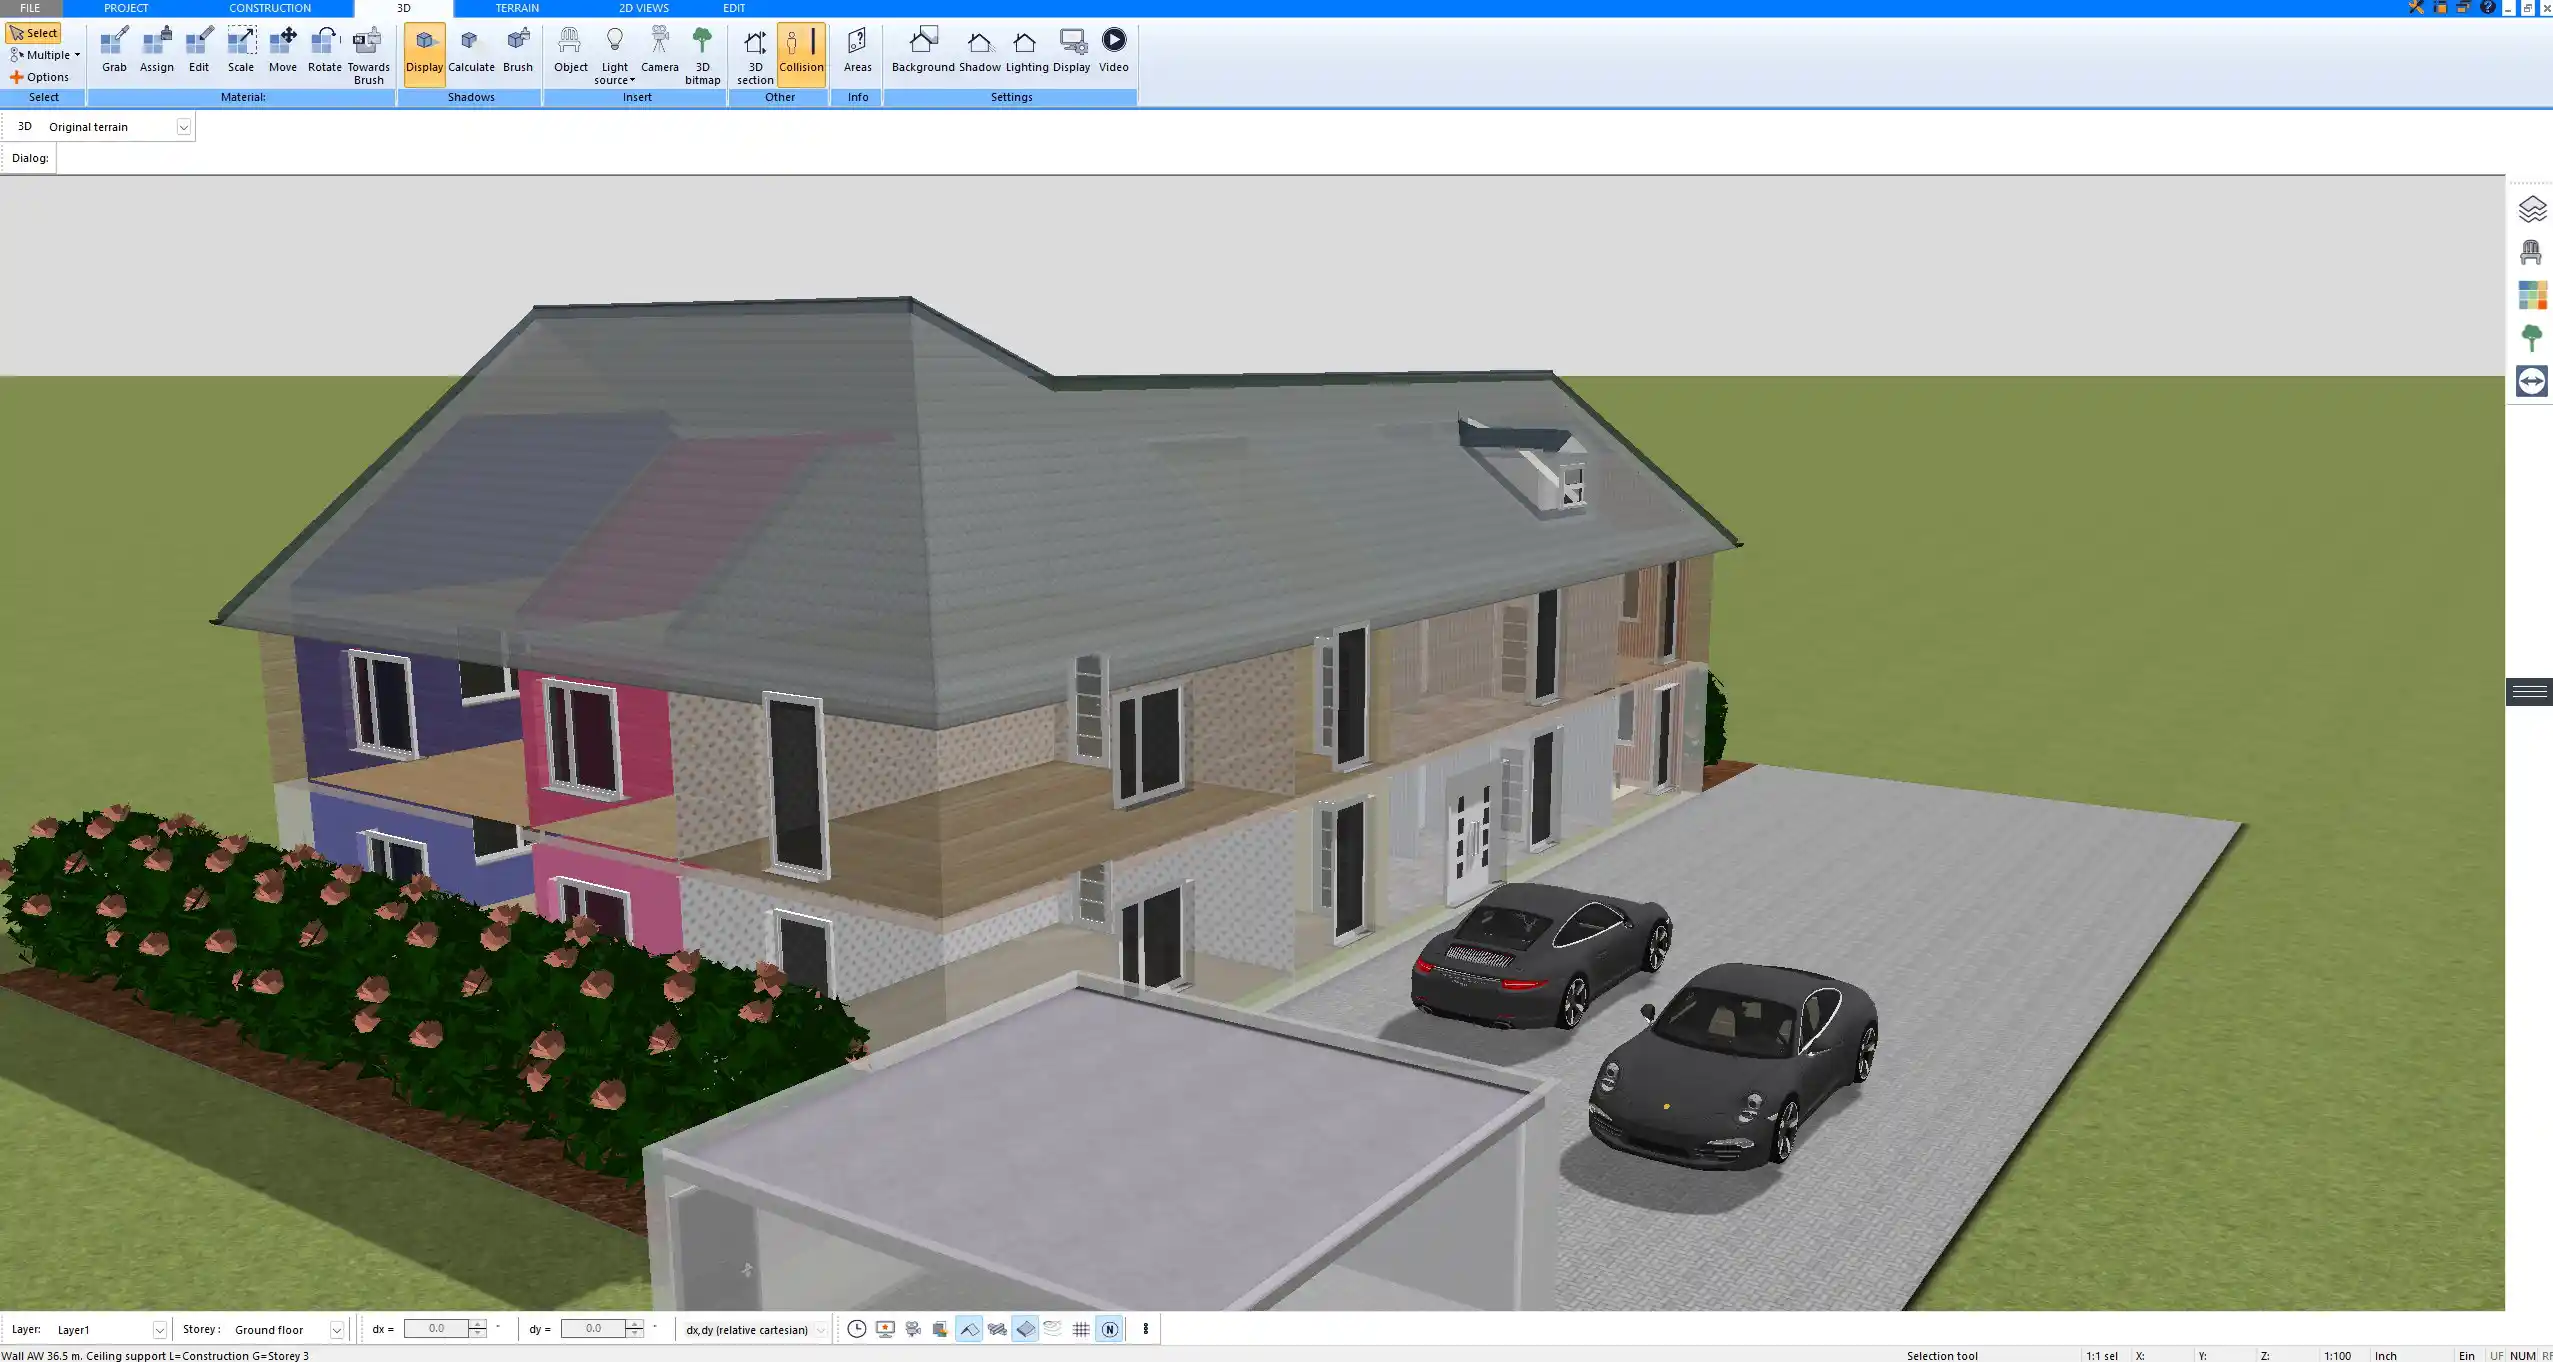
Material textures, wall colors, flooring, furniture, and landscape elements can be added in 3D for a more realistic view. If you wish, you can also generate photorealistic renderings to share with others.
Tip: Use the built-in camera tool to take screenshots of your design or create a 3D video walkthrough.
Step 5 – Export Floor Plans or Construction Drawings
Once you’re happy with the design, you can export your floor plans in professional formats. You can print the drawings or save them as PDF, DWG, or IFC files for digital use.
The software also allows you to create scaled plans with accurate measurements, wall labels, and room names. This makes it easier to communicate your plans with contractors or submit them for permit approval if needed.
Common Types of Home Extensions You Can Plan
Ground-Floor Additions
This is one of the most popular extension types. You can add extra living space, expand your kitchen, or create a home office. Plan7Architect allows you to integrate the new space seamlessly into the existing structure and foundation.
Second-Story Additions
If you need more space but can’t build outward, you can go upward. Adding a second story involves designing the new floor level, ceiling height, stair access, and roof adjustments. You can model everything within the software, including how the second story aligns with the first floor.
Side or Rear Extensions
These types of extensions are ideal for properties with extra lot width or depth. Side extensions work well for widening kitchens or creating dining areas, while rear extensions are often used for living rooms or conservatories.
Loft & Attic Conversions
You can model an attic room by defining the roof angle, dormer windows, and ceiling slopes. Plan7Architect lets you build and furnish these spaces with slanted walls and structural features.
Winter Gardens or Sunrooms
Glass-based extensions like sunrooms can be fully planned in the software. Choose transparent wall segments, add frame systems, and adjust insulation or shading elements as needed.
Tip: For sunrooms, use Plan7Architect’s daylight simulation feature to test how the sun moves through the space across different seasons and times of day.
Practical Planning Tips for Your Extension Design
Think Ahead About Permits
Include all structural and visual elements in your plan to make building approvals easier. A complete, clearly labeled plan can speed up permit processing with local authorities.
Leave Room for Utilities
Don’t forget to plan space for heating, electrical systems, and plumbing. You can indicate zones in the software and use symbols or notes for service lines.
Match or Contrast the Existing Style
Visually, your extension can either match the materials and style of your existing house or create contrast with modern designs. You can experiment directly in the software with different textures, roof pitches, and cladding materials.
Optimize for Natural Light
Natural lighting improves comfort and reduces energy use. Plan large windows, glass walls, or skylights in your extension, and use the shadow simulation tool to test different daylight situations.
| Element | Recommended Tip |
|---|---|
| Roof design | Match pitch and direction for harmony |
| Wall finishes | Use texture preview to compare materials |
| Foundation height | Keep level with existing slab |
| Entry points | Align door heights and thresholds |
| Drainage slope (outdoor) | Maintain 1-2 percent for surface water |
Advantages of Using Plan7Architect for Extensions
-
Specifically designed for homeowners and semi-professionals
-
Supports 2D construction drawings and 3D visualizations in one software
-
Flexible unit system: work in metric or imperial, depending on your needs
-
Affordable and easy to use compared to many traditional CAD programs
-
Real-time design updates while planning your extension
-
Visual results help in decision-making before construction begins
-
Print-ready plans with exact measurements and export options
Tip: Use different layers in the software to organize your base house and extension separately for easier editing.
Frequently Asked Questions
Can I use the software without architectural experience?
Yes. Plan7Architect is made for non-professionals. Its interface is drag-and-drop based, with intelligent tools that guide you through the design process step by step.
Is it suitable for US, UK, EU, or Australian homes?
Yes. The software supports both imperial (feet and inches) and metric (meters and centimeters) units. You can switch between them at any time.
Can I plan a full second floor with this?
Yes. You can add entire floors, configure staircases, and define roof types to fit your second-story layout.
Are plans exportable for contractors?
Yes. You can print or export plans in professional formats like PDF, DWG, or IFC, including all technical details needed for construction.
Your Home Extension – Designed by You, Made Easy with Plan7Architect
With Plan7Architect, you can take full control of your home extension project—from early sketches to full 3D walkthroughs and printable floor plans. Whether you’re extending outward, upward, or creating a modern glass addition, the software provides all the tools you need. You can work with exact measurements, visualize your space realistically, and create plans suitable for contractors or approval offices. Planning your home extension has never been more accessible.
Plan your project with Plan7Architect

Plan7Architect Pro 5 for $99.99
You don’t need any prior experience because the software has been specifically designed for beginners. The planning process is carried out in 5 simple steps:
1. Draw Walls

2. Windows & Doors

3. Floors & Roof

4. Textures & 3D Objects

5. Plan for the Building Permit

6. Export the Floor Plan as a 3D Model for Twinmotion

- – Compliant with international construction standards
- – Usable on 3 PCs simultaneously
- – Option for consultation with an architect
- – Comprehensive user manual
- – Regular updates
- – Video tutorials
- – Millions of 3D objects available


