Within Arcon Evo we make use of common CAD drawing methods and one of the most useful for accurate drawing is the Snap function. In CAD terms, Snap represents the method used for drawing elements to be pulled together to ensure they connect exactly with the desired component. Effectively adding virtual ‘magnetism’ to elements to ensure they fit together accurately.
In Arcon Evo we can make use of the flexible options for the Snap function in order to select the strength of the ‘pull’ to the snap point as well as the snap targets we wish to use. One of the most common mistakes with the snap function, which can cause confusion is to allow the snap to function over multiple layers, resulting in too many elements effecting the cursor. This often manifests itself on-screen as a jumpy/jerky cursor movement.
1) Navigate to Options>Snap
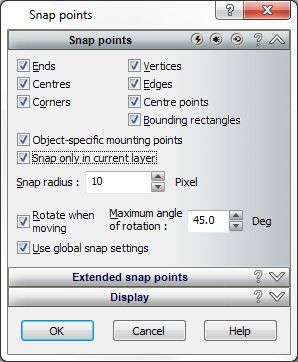
2) You bill be presented with the following dialogue box:

3) There are three tabs in the options box. Select the first tab ‘Snap Points’
4) This shows the location of the snap points on an object which can be selected or deselected as required. You can also adjust the sensitivity of the snap function by adjusting the value of the Snap Radius (higher number means the cursor is ‘pulled’ from further away from the snap point than a lower number. 10-20 pixels is normal but you may wish to adjust this depending upon screen size, resolution etc.)
5) Locate the tick box labelled Snap online in current layer and untick this option. This will enable the cursor to only snap to elements in the active layer (which includes floors) and so will display more predictable behaviour
6) Once you have made the required changes, click OK to apply them

